Jump to content
  • entries
    945
  • comments
    4,956
  • views
    1,221,228

Three chips off the old block


Nathan Strum

1,943 views

Keeping an old 2600 running isn't always easy...

My original 2600 is kind of an odd one to begin with, in that it was a factory reconditioned Sears console, with a light-sixer case, but heavy-sixer insides. Apparently, this is just something Atari did. It makes sense - if they're factory-refurbishing something, they'll put it back into the best, or newest, case available.

In 2002, as I dusted off my 2600 for the first time in years, I noticed the springs in the switches were broken. These were the chrome-capped switches Atari used when reconditioning their consoles, although I didn't know that at the time. I thought they were just stock switches. So I ordered some replacements, only to find out they were the aluminum-finish ones instead. I was disappointed, but installed them anyway. In hindsight - I would have disassembled them, and kept the chrome switches, just repairing the springs.

In 2008, my 2600 died. In that case, it turned out to be the hex buffer (CD4050) - which was a pretty easy fix. Thanks to batari and supercat who suggested that was the problem.

Then, in 2011, it died again. This time though - I couldn't get it working again. I wasn't sure what the problem was, although the console had taken a lot of abuse over the years as the guinea pig for my mods comparison tests. I tried swapping chips with a working four-switch Vader, to no avail. Meanwhile, I used the Vader as my daily driver.

In 2015 I bought a populated six-switch donor board from Best Electronics to swap parts with, in an attempt to get my original console working again. But despite my "best" :roll: efforts - my original 2600 just wouldn't work. Its TIA was good though, since that worked in the donor light-sixer. But its 6507 and RIOT wouldn't work, so I figured those were bad. But even swapping all of the donor's chips over to my 2600 didn't get that working.

So then the donor board went into my original 2600's case, "fixing" it. But it wasn't really fixed, and I still really wanted to get as much of my original 2600 working as possible.

Then recently, mojoatomic began selling capacitor and voltage regulator kits. Now, these parts can be found at Digikey or Mouser, but the nice thing about buying his kits, is that he buys them in bulk, and saves you the trouble (and shipping costs) of hunting them down yourself. Everything's just there in a neat little bag. Plus, he posted instructions on what to replace. And he also sells brand-new replacement power adapter jacks. Very nice!

cap-kits.jpg

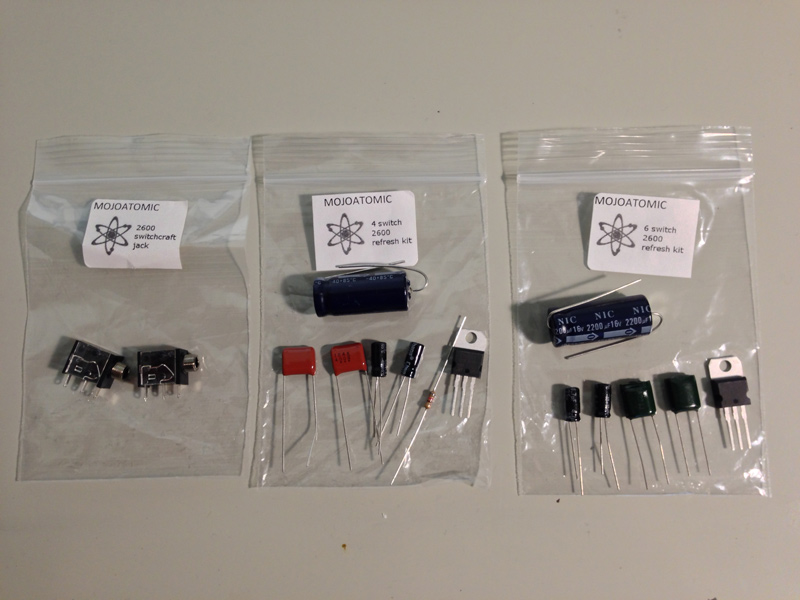
So, hoping this might have been part of my original 2600's problem, I ordered up some kits and installed them.

But again, to no avail. Swapping the chips with the donor light-sixer still didn't fix it.

Mojoatomic also suggested checking for cold solder joints and bad connectors on the IC sockets or cart connector.

So, I spent a pretty long evening desoldering and replacing the IC sockets, and completely re-soldering the cart connector.

Still nothing.

At this point, I was about to give up and take up mojoatomic on his offer to see if he could fix whatever was wrong. But first, I tried one more thing.

I pulled the RIOT and 6507 from the Vader again, and popped those into my original heavy board.

And it worked! My Atari was back! For realsies, this time! :-D

So what happened, and why didn't the donor-sixer's chips work in my board? They worked in the light-sixer, and the chips are all the same, right?

Well... not exactly.

Since I first got the donor board, it always had a slightly odd quirk. It worked fine, but whenever I pressed the fire button on the joystick, the picture would dim slightly.

I had hoped recapping and replacing the voltage regulator on the donor would fix that problem. But it didn't. Yet - the console still worked. So I assumed its chips all worked.

But apparently, the RIOT is going bad. It's not bad enough to fail on the light-sixer, but it is on the heavy. So I was trying to troubleshoot using a bad chip. :roll:

Once I put the Vader's RIOT into the donor-sixer, the dimming problem went away.

I think the sequence of events went like this:

My power adapter had some sort of problem. When it did, it took out my original console's RIOT and 6507. (That power adapter has - quite recently - fully up and died. So I'm sure now it was the culprit.)

It may have also taken out the voltage regulator or a cap somewhere. This would explain why originally transplanting the Vader's chips didn't work.

It may have also damaged the donor light-sixer's RIOT, causing the dimming problem. But I have no way of knowing that.

In the end, I had a bad 6507, and two bad RIOTs.

But now I have two re-capped 2600s with new voltage regulators and power adapter jacks, and I know they both work. I'm going to go through and upgrade my Vader and another four-switcher I have with those kits as well.

I've ordered up the replacement chips I need from Best, as well as a few other goodies (power supplies, joystick rebuild kits, and a speaker upgrade for my pimped-out Lynx).

For the time being, I'll keep the Vader's chips in my original console, so that for the first time in almost six years, I finally have a working heavy-sixer-in-a-light-sixer-Sears-shell 2600 again. :D

Now all I need to do is find another set of six chrome-capped switches. :ponder:

  • Like 6

18 Comments


Recommended Comments

"Now all I need to do is find another set of six chrome-capped switches. :ponder: "

Drool...


Thoughts on putting 6 Chrome Switches in a 1978 Heavy 6er, OR a regular Light Sixer,

assuming the end machine remains stock RF operational PLUS hidden modern modifications like Composite, S-Video, Component, or RGB output??

Link to comment

At the moment, it's fully stock. My CyberTech S-video mod needs repair (I have the parts, just need to do the soldering), but once that's done, it may go back in. It's non-invasive though. ;)

Link to comment

Lookie what I found in a box in my closet...


shinyx6.jpg


They need a little reconditioning... but soon the shininess will return!

  • Like 3
Link to comment

Oh darn you found you had some!

I see an eBay BIN with chrome switches they don't know they have.

I want the usually unwanted CX22 with the black bottom that does not have true Trak-Ball mode. The rest of the items are dups crap.

Link to comment

I was really hoping not to have to buy another 2600 just to strip the switches off it. ;) I didn't realize mine were all still there, and in that good of shape.


Also, my order from Best came yesterday, so I can put all of my chips back where they belong. I've finished recapping all of my 2600's and the RF looks nice and clean now (for RF, anyway). Still have to fix the S-video mod, but I don't think that will take long to do.

Link to comment

I got my S-video mod working again. I'd forgotten how good S-video looked! If anything, it's a bit deceptive because some graphics just completely break down in RF. So I'll need to keep an RF unit handy so I can test homebrews under both types of output.

What had happened, was the original mod had really long posts sticking out of the bottom of it that went into the TIA socket on the main 2600 board.

mod-original-pins.jpg

They were also really thick, and it took a lot of pressure to plug it in to my original 2600's TIA socket. I had to file the pins down thinner to get them to go in without fearing I was going to break something:

mod-trim-pins.jpg

Well, with all of the mod tests I'd run, removing and re-installing the board many times over, one of the pins finally broke off.

Since my 2600 died around the same time, I didn't bother fixing the mod until after I'd gotten my 2600 working again.

To fix it, I didn't want to put the same thick, over-long pins back in it. So I clipped them all off, desoldered the socket, and replaced it with two sockets that have shorter and thinner pins, stacked on either side of the board:

re-mod-close-up.jpg

The pins from the top socket extend through the board, and all the way into the lower socket. And yes, some of the pins are clipped off, because that part of the TIA is being bypassed by the mod. That matches the original.

I soldered only the pins that have to connect to the mod circuitry (indicated by the black marks on the edge of the board), and the rest just pressure-fit together, since they're just a pass-through from the Atari to the TIA and don't really need to be soldered.

To connect audio and video, I have a second board with a terminal block and the A/V connectors on it. This way I can quickly disconnect it without desoldering anything, and can run the thin wires through the existing holes in the 2600's shielding. The second board will just sit inside the 2600's case, and I can run my audio and S-video cable to it through the existing RF cable hole. No cutting, no permanent modifications.

re-mod-overview.jpg

When installed, the mod sits slightly lower than the original did. Nice and neat, and much easier to install.

Repaired version (note replaced TIA socket):

re-mod-installed-2.jpg

Original:

mod-original.jpg

So the next thing to do, is pull apart my original 2600 again, replace the switches with the repaired chrome ones, re-install the video mod, and I'll be good to go!

Link to comment

The Australian that sells the 2600 RGB board recommends replacing the white connectors with regular 'dual wipe' black ones.

I guess that means it contacts on both sides of the pins?

Plus the replacement allows thicker pins.

Link to comment

Can you buy chrome switches anywhere?

Anyway, I have my set of 6.


I'll probably put them in one of my heavy sixers, just not the lowest Serial Number one. I'll keep that for show.

The RGB mod also has S-Video and Composite, and the RGB can be changed to Y Pb Pr with an adapter they also sell.

Why a heavy sixer? Because the RGB mod allows power on with the pallet switch held to bypass the mod altogether leaving RF working!

Link to comment

I got my S-video mod working again. I'd forgotten how good S-video looked! If anything, it's a bit deceptive because some graphics just completely break down in RF. So I'll need to keep an RF unit handy so I can test homebrews under both types of output.

So true - on my CyberTech 2600 I prefer vector Space Rocks, while on my RF 7800 I prefer solid.

Link to comment

The Australian that sells the 2600 RGB board recommends replacing the white connectors with regular 'dual wipe' black ones.

I guess that means it contacts on both sides of the pins?

Plus the replacement allows thicker pins.


I replaced the white chip socket as part of my recent refurb. It uses the other type now. I'll post a photo once I get the mod moved over.


Can you buy chrome switches anywhere?

Anyway, I have my set of 6.


Apart from buying a 2600 to pull them from, not that I know of. The ones I have are the originals from my 2600. I'm having to do a bit of creative surgery to re-use them, since the two bad switches are un-repairable.

Link to comment

Well, I couldn't save one of the switches - I effectively destroyed it trying to get it apart (tried removing the cap - and it just wouldn't budge, the rest of the switch was beyond fixing). So I put the aluminum ones back. Someday, I'll try and find chrome ones again. All I really need is one Select or Reset switch, since I did salvage the other five successfully. (Found out after the fact, the caps are glued on, and a heat gun might remove them. Oh well...)


Anyway...


I got the 2600 back together with the video mod and replacement chips from Best, and all works again. Here it is just before the shell went on:


re-mod-final.jpg


The mod is easily removable (well, with about a dozen screws), but hopefully this will be the last time I pull this apart for awhile.


Now then... where did I put my Trak-Ball™?

  • Like 1
Link to comment

Please let me know when you are going to have a look at Marble Craze. I will send you the latest version then (and with some cheats if you like).

Link to comment
Guest
Add a comment...

×   Pasted as rich text.   Paste as plain text instead

  Only 75 emoji are allowed.

×   Your link has been automatically embedded.   Display as a link instead

×   Your previous content has been restored.   Clear editor

×   You cannot paste images directly. Upload or insert images from URL.

Loading...
  • Recently Browsing   0 members

    • No registered users viewing this page.
×
×
  • Create New...