


Entry posted by Karl G
1,004 views
Traditionally, when learning a new computer language, it is common to make one's first program in that language be a simple program that displays the message "Hello, world!". Displaying text on the Atari 2600 is a bit more complicated, so instead a simple example that is commonly used is a demo that changes the background color on each line to fill the screen. Here is an example from SpiceWare's Collect Tutorial:

At the end of this lesson, we will make a very simple minikernel in a similar fashion, but on a smaller scale.
First, I am going to give a little background that will be expanded upon in later lessons. This may be review for some of you, so feel free to skip ahead to "Our First Minikernel" if you already know this information.
What is a Minikernel?
A minikernel is a small bit of asm code that runs after the bB screen has displayed, but before the score has been displayed (if present). If you are using the standard kernel, you should have 14 scanlines to work with, more if you are using the "noscore" option.
What is a Scanline?
A scanline is a single horizontal display line. For NTSC displays each frame consists of 262 scanlines, and approximately 192 of these are visible. The remainder are used for computation, both before and after the visible screen (see below).
For reference, each player, missile or ball in the bB standard kernel is two scanlines high. The default playfield pixels are 16 scanlines high. Some minikernels, such as the 6lives minikernel, display graphics a single scanline at a time. That is why llves icons appear squished compared player graphics that use the same data.

The diagram below, taken from the Stella Programmer's Guide, shows the timing for a single TV frame. The parts of the diagram that we will discuss now are Vertical Blank, the visible screen, and Overscan.

Vertical Blank
This is run before the visible screen is displayed, and is typically 37 scanlines in length for NTSC displays. With 76 machine cycles per scanline, there are 2812 cycles that can be used for game logic, etc. bB uses a good portion of these cycles to do setup code, such as positioning of objects (both players and missiles, and the ball). The remaining cycles are available to the bB programmer via the vblank function.
Visible Screen
This is the portion of the screen that can be seen where the players, missiles, ball, and the playfield are drawn. This includes the normal bB screen, the minikernel (if any) and the score (if displayed). The number of lines on the visible screen can vary somewhat, with the standard value being 192.
Overscan
This is run after the visible screen is ended, but before the next frame starts. Overscan is usually around 30 scanlines, or about 2280 cycles. Most bB code runs in the overscan area. Once drawscreen is called, the code waits for the remaining overscan time to expire, then starts a new frame.
Our First Minikernel
Enough background - let's go ahead and create our first minikernel! First we need a batari Basic game that will include our new minikernel. I have made a simplistic 2-player game for this purpose: "Cannons".
cannons.bas

The object is to hit your opponent 3 times before they do the same to you. The game uses pfscore bars to track lives. Wouldn't it be cool though if the game instead displayed little cannons of the appropriate color on each side to track lives instead of the squares? That's what we will do in future lessons. For now, though, let's create a very simple minikernel that does something visible on the screen, and then include it in our game.
Create a file named "2playerscores.asm" in the same directory as "cannons.bas", and add the following lines to the file:
minikernel ldy #14 ;14 scanlinesminikernelloop sta WSYNC ; Wait until the start of a new scanline sty COLUBK ; Store the value in the Y register into the COLUBK register dey ; Decrement the value in the Y register by 1 bne minikernelloop ; goto minikernelloop unless the Y register now contains 0 rts
We will go into basic 6502 instructions in the next lesson, but for now here is a line-by-line description of what we are doing in our minikernel.
minikernel
This is a label, like the ones used in bB. Labels have to start the line with no leading spaces, as they do in bB. The bB kernel looks for this label, and jumps to it after the bB screen is drawn if it is present.
ldy #14 ;14 scanlines
Load Y register with the number 14. Note that the # sign before the number is to tell the assembler that 14 is a number value, and not a memory address. Also note that a semicolon is used for comments, as it can be in bB.
minikernelloop
Another label. This one is used to mark the beginning of our loop.
sta WSYNC ; Wait until the start of a new scanline
Store the value in the A register into the WSYNC register. In this case, however, it does not matter what value is in the A register. The WSYNC register is referred to as a "strobe register", which means that it is triggered by any write operation, regardless of the value. In this case, writing to WSYNC will pause the CPU until we are at the beginning of the next scanline.
sty COLUBK ; Store the value in the Y register into the COLUBK register
This puts the value in the Y register (14 for the first loop iteration) into the COLUBK register, thus changing the background color to be drawn.
dey ; Decrement the value in the Y register by 1
Subtract 1 from the value stored in the Y register.
bne minikernelloop ; goto minikernelloop unless the Y register now contains 0
If subtracting 1 from the Y register did not cause it to become 0, then goto the start of the loop. Otherwise, continue to the next line.
rts
Return to the standard kernel at the place the minikernel was called.
Now, let's test our code! To include the minikernel, add the following line as the last line of cannons.bas (or in the last bank of a bankswitched project):
inline 2playerscores.asm
Compile cannons.bas as normal, and try running it. You should now see something like this:
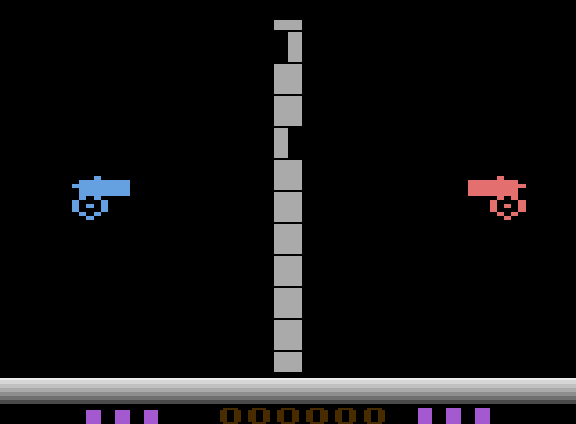
We now have a gray gradient bar after the bB screen. Cool!
You may have noticed a couple of side-effects, however: the score is now visible, which wasn't true previously, and the game background is now black.
The background changed color because of our minikernel ending with the COLUBK register set to black. The score had previously not been visible because it had deliberately been set to the background color in order to not be visible. There are two ways to handle this:
1) Move the COLUBK lines in cannons.bas to inside each of the adjacent loops - the main loop and the game over loop. This will restore the background color every frame regardless of what the minikernel does.
2) Ignore it. We are only changing the background color now for demonstration purposes, so the issue should be temporary.
Summary and Next Lesson
In this lesson, we learned how to create a very simple minikernel, and include it in a batari Basic game. In the next lesson, we will learn some common 6502 assembly commands, and show how to use these to modify our minikernel.
-
 1
1

7 Comments
Recommended Comments