


DaNDeE
-
Posts
35 -
Joined
-
Last visited
Content Type
Profiles
Forums
Blogs
Gallery
Events
Store
Posts posted by DaNDeE
-
-
Please add me to the list... definately want to buy one.
Thanks.
-
 1
1
-
-
Short update: Just found this on ebay
Name seems to be Belden LL14847 Power Cale ...
I have not ordered it yet, hence I could not test and see, if it fits.
cheers,
falk
-
Hy Ksarul,
thanks you big time. I will check ebay and see, if I can find something in the wake of vacuumcleaners. Replacing the terminal is the last option.
cheers,
falk
-
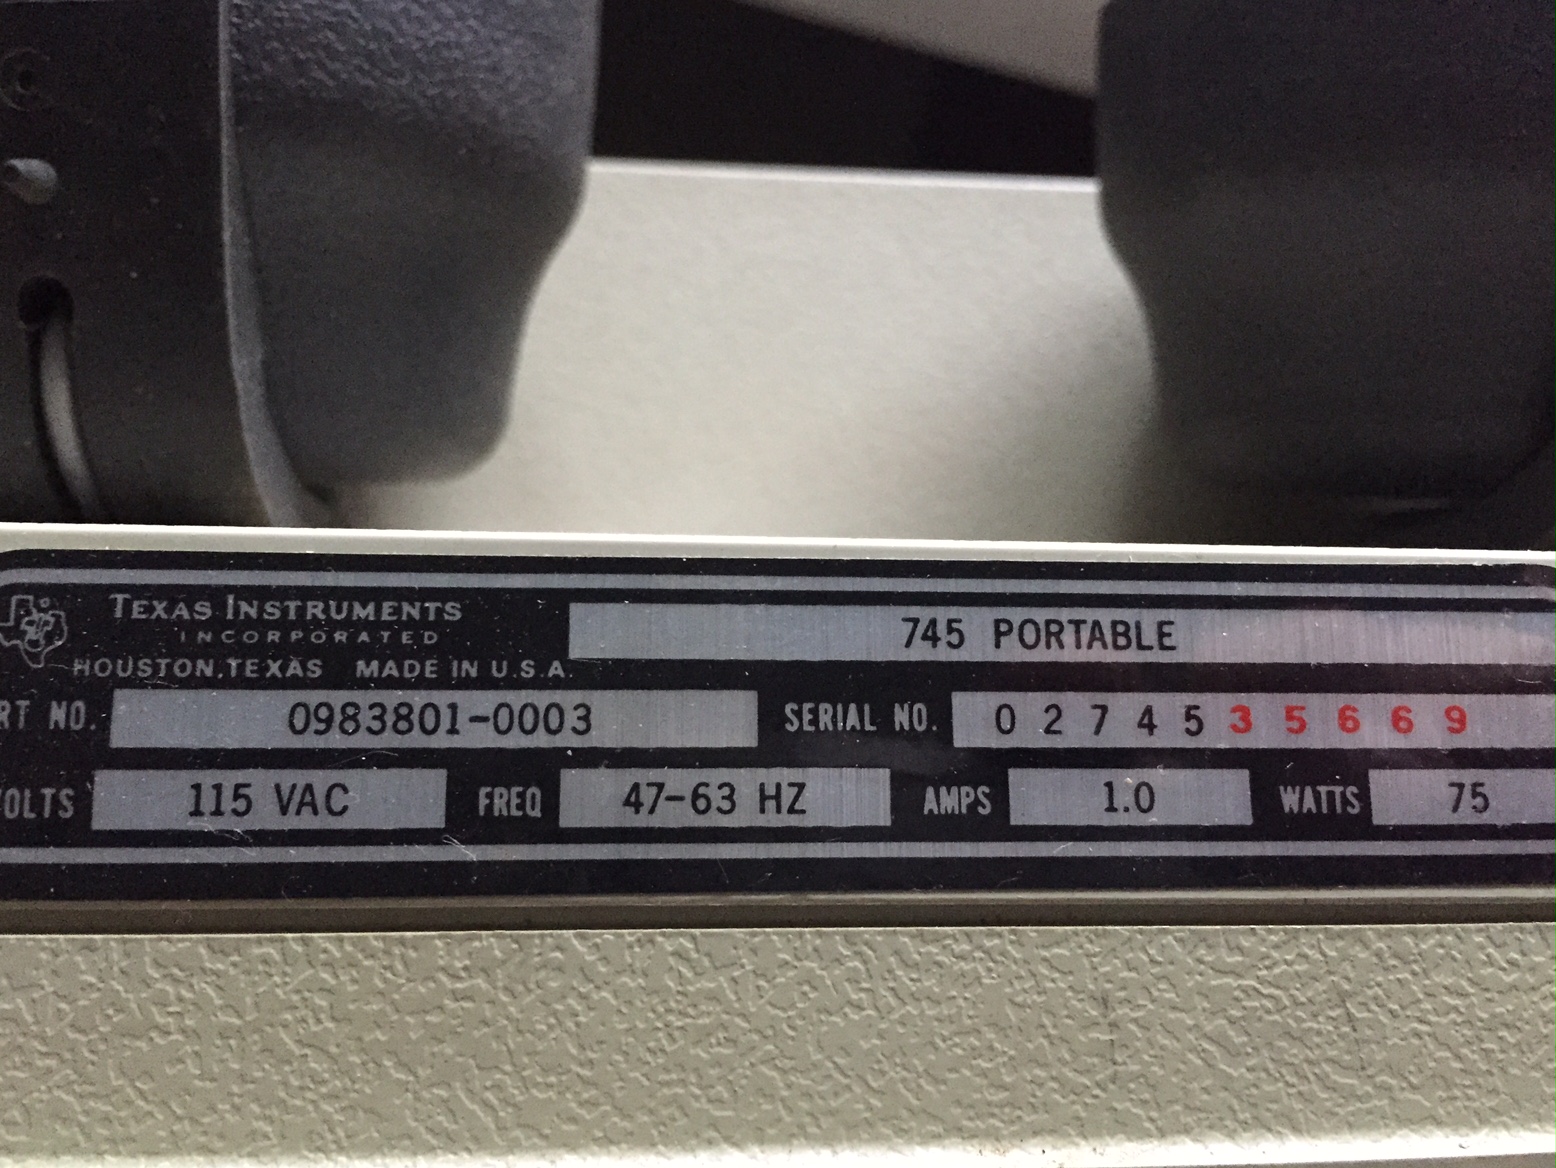
Hey Ksarul, thanks for the hint.. count me stupid or probably it's just because of our second kid was born on monday and sleep has become somewhat of rare thing to happen. I can't find any section 2... and how does the part number help me any further? With this number I could only approach TI directly, or does it give a clue on how that cable or connector is called?
Here's picture of the serial.
I'll be really happy for further help.
cheers,
-
Doing a bit of Googling on the Silent 700, it looks like it uses a transformer between the wall socket and the machine to drop mains voltage to about 20 Vac. It doesn't take mains voltage directly. Just making sure you're aware!
Stuart.
Hi Stuart,
thanks fot the hint and "uuummpf"... this will be hard to track down. I wonder how it would be carried around, as there is no space inside the case and nothing where to put such an external PSU into.
On the manual I couldn't find any note about it as well (http://passthrough.fw-notify.net/download/021081/http://www.decadecounter.com/vta/pdf2/TI%20Silent%20700%20Model%20745%20Operating%20Instructions.pdf).
On page 10 it says that you should just plug it directly into the wall socket (115V).
There are other models of the TI 700 Series... probably you got another one?
best,
falk
-
Great. Thank you.
-
Hey guys,
I recently got a TI Silent Type 745 Terminal, but it is missing the power cord. It seems to be something old from the 70s and as I live in Germany, it is kind of hard to get information about it. Anybody's got a clue what kind of cable this is, and how it is called, or where to obtain it?
The plug is about 3cm wide, with is about 1.1inch and has three terminals.
Thanks.
falk

-
Cleaning a landfill cart defeats the purpose of owning one. Yeah put some baking soda in there. That'll kill any odor.
Right. I actually not want to clean it that it looks like new, only want to get rid of that bad smell. Right now, everything is in a dirty ziplock, that is covered with dirt and dust so that you can barely see whats inside and smells like... well... dumpster (how come?
 ).
).Baking Soda might be an option... good one. Thanks.
Next summer, I will try to expose it to sunlight and fresh air, for a couple of days. Maybe this will help too.
-
Hey! I got one of those excavated Carts as well - Defender - and want to put it up on the wall. Has anybody found a cure to the odour problem? So far I only opened the ziplock twice, only to close it asap again. I read something about cleaining it with some dish soap and cleaning rags..... is that the right way to go?
Thanks.
-
A little bit late, but I read somewhere that you get this kind of random char trash on you screen, as long as you don't have disk to boot from inserted into the drive. Hit the break key and you should get to the promt. At least that's what was told about the model I with expansion unit.
cheers.
-
Hey. This saturday the weather was good and so we did not have too many visitors on the first half of the day and that gave me some time to tinker around.
Short story: it works! Long version: I used Copymate 4.4 and had to set the source and destination to drive LUN 1. Than I mounted an image on the SIO2SD and copied it to RAM, having the real floppy turned off. After all tracks are read, I pulled the power on the SIO2SD and turned on the 810. This way it works. Accidentally, I left the SIO2SD on once and is copied back the image to the virtual file... so it works in both directions.
Whenever SIO2SD is turned on, it takes alle the commands and the real floppy drive is just dead. It would be nice if there's a way to only mount one floppy drive (lets say D1:) on SIO2SD and not 4 at once, so that you can just set SIO2SD to drive 2 and the real drive to LUN 1. I couldn't get the game mode to run properly and didn't have the instructions at hand... maybe that does the trick.
best,
dan
-
Well, if I recall it correctly, it was something about D5? Does this command exist? Will see if I can find the time to test it again, this weekend... if I can find my disk with the copy tools again. It looked to me, as if the copy tools were waiting for some kind of acknowledging signal from the SD2SIO, to start working on the real drive.
" electrotrains"??? JAC! (http://www.wudsn.com) was testing it out with me and he assumed that there seem to be some DOS commands missing.
best,
dan
-
Happy to see that you still work on this. We are having an Atari exhibition over here and in the wake I tried to copy some diskimsges back to real floppy disks, but without luck. Every copytool i tried seems to get stuck at a certain point. Someone sugested that the status codes might not be implemented correctly and so the copytools don't get the apropriate feedback. Any idea how to fux this, or am I the only one having this problem?
Chhers.
Dan
-
Guys, you rock! Thanks a lot.
-
Okay, I got another one that I can't get recognized. Any idea what the font of the headline "Millipede. In a forres..." is?
http://flyers.arcade-museum.com/flyers_video/atari/11010803.jpg
Thanks.
Dan
-
Indeed. Thanks.
-
Heyho.
Someone got an idea or knows what's the name of this font?I am looking for the fonts on the old Atari catalogs, from the early 80s. I tried Whats The Font but the result is just close, but not the real thing. Here is picture from a headline that I took out of a catalog from 1983 (?). This font is used in all adds around that time.
Thanks.
Dan.
p.S.: I didn't know where to put a request like this, so if this should be the wrong place, please move it. Thanks.

-
Hey there.
Does anyone have good scans of a stripped (emptied) VCS Mainboard. Preferably the oldest (heavy sixer) ones. I would need both layers, ob both PCBs. Any idea where to find those?
Thanks and cheerio
DaNDeE
-
Hey.
Yes! I finally got it all wired up and it is working really well. (
). I don't know what Draco did, but as far as I understood, he took the default settings and it works. I got a few games that seem not load.. did not have much time to tinker around with the settings though.However I started to work on a case that looks like an old A810 drive… you can read about it here: http://computer-classics.de/cah_blog2/atari/sio2sd-arduino-based-thanks-diskwiz/
Not sure when I will find the time to go on with all this. Right now, I rather play with the Atari and that was the reason to build this device in the first place.
Thanks a million for you patients and help.
cheers,
-
2
-
-
Heyho.
Finally I got Draco into helping me with flashing the AVR. He was asking for the correct setting for the fuses to go with AVRDude... can someone please help me with this? Building the hardware was easy somehow, but the whole AVR thing is really new stuff.
Thanks alot.
cheers.
-
Hey.
I soldered all the stuff together and could test the display so far, for the rest I will need to attach the SIO cable and flash the .hex. Some more questions. When I look at your links I found this pinout for the SIO. Is this seen from the front or the back of the plug, hence is it for the plug or the port?
The serial connector pin-out
1 1
2 4 6 8 0 2
-----------
/o o o o o o\
/o o o o o o o\
-----------------
1 3 5 7 9 1 1
1 3
1 clock in (to computer)
2 clock out
3 data in
4 GND
5 data out
6 GND
7 command (active low)
8 cassette motor control
9 proceed (active low)
10 +5V/ready
11 audio in
12 +12V (400/800)
13 interrupt (active low)
I ordered one of these SD card slots from ebay.
It has MOSI and MISO instead of DI and DO from your pinout list... does this matter, or is it the same? You used an micro sd slot, right?
Thanks,
dan
-
Well, how much are those PCBs? Although I got all parts for the Arduino rebuild it would not hurt to have 2 or 3 of those drives around for the other Ataris. Postage might be a big high... but if I ask the other guys and we share the cost.
best,
dan
-
Thanks! I read on you blog about you starting all this to show your son some old school computing.
Some friends and me are trying to establish a center for old school computer and console culture around here in the Frankfurt area.<highjack spam anncounce modus on>
The project is called digital retro park (www.digitalretropark.de - german only, sorry). The idea is to preserve and show the old hardware and great innovations to the younger people and those who almost forgot. The basic idea is to have a hands-on exhibition and have all the old computers and consoles up and running - hence park in the name (like a theme park). Electronics behind glass and turned off is only half of the experience. Things like the broken Atari 800 and the 5200 that the postmen bailed and broke (see my other thread) are going to be machines for the hands-on area now.
<highjack spam anncounce modus off>
Money is short, as usual, and so your way to go with an arduino for hooking up an SD card to SIO makes it really cheap compared to the SIO2SD from ABUCC or the AtariMax stuff - affordable for us now.
Bottom line: you help us show the old stuff to the younger generation and make it a hands-on experience. Same reason you build it for your son. Thanks for that. (y)Baby needs some attention now...
cheers
-
SIO pin 5 (data out) to Arduino Digital pin 0 (PD0)
SIO pin 3 (data In) to Arduino Digital pin 1 (PD1)
SIO pin 7 (command) to Arduino Digital Pin 8 (PB0)
I had to look at the sio reference and my schematic to get that.
 I am used to looking at the Atmel pins and not Arduino these days.
 Let me know if this helps. If so, I should probably add it to my site.
Great! That's what I was looking for. This Should help. However on monday our daughter was born and right now everything is upside down over here. Don't know when I will find the time to put everything together...parts arrived on monday as well. Life is strange, fascinating and right now with pretty less breaks for sleep. At least now I have something around me that is not controllable with a joystick and does not have a Run/Stop or escape key.
cheers


Looking for an Apple II keyboard
in Apple II Computers
Posted
Hey everyone.
I am on a hunt for a an Apple II keyboard, for my Apple I replica project. The prices on eBay are just insane. Does anyone have one spare and is willing to sell/trade it?
cheers,