


Tezz
-
Posts
2,515 -
Joined
-
Last visited
-
Days Won
4
Content Type
Profiles
Forums
Blogs
Gallery
Events
Store
Everything posted by Tezz
-
 Sounds great. I'll look out for your updates.
 -
How are things progressing with this? Although this is being designed to fit into an SF314 case with much of the original parts retained I'm still hoping that it will go on further to something we can build from scratch in a custom 3D printed case. I'm considering getting the Kryoflux mini 1050 case printed just to see how it could possibly look next to the XL. I've got a bunch of 3.5" DSDD disks and an NEC 720k drive mech aside for this.
-
When I was creating the Zeppelin compilation disk in 2013 to demonstrate the use of XBIOS with colour loaing screens during SIO I fixed some things with Blinky's whilst adding the new loading sequence. I should revisit that at some point and also add NTSC support including delaying the music.
-
Good luck Bob, the Spectrum disassembly is available if you'd like to look through it.
-
I've decided to build a Kryoflux to get to grips with backing up/imaging everything up this year. I have thousands upon thousands of floppies stored away from all the years of use with the A8, ST, Amiga and Akai sampler. There's also cassettes with the Sinclair stuff to deal with later. Many of the disks with our sourcecode for the games/demos and other projects have not been backed up or seen the light of day for a very long time so it will be interesting to explore them and see what's worth posting here too.
-
If I've remembered everything, this is my current Atari 8-bit only equipment.. 5x) 800XL Including my original one from the mid 80's. They are all stock machines except one which has 512KB SRAM installed 1x) SECAM 800XL I'm currently building some new modern power supplies for all of the XL's. 2x) 600XL One is my main current setup with Ultimate 1Mb, VBXE2 with DIN13, Simple Stereo with Uswitch. Powered via a PWR3 PSU from Lotharek. Ultimate cart, AVG cart, Sdrive Max The other 600XL has simply been upgraded to 64Kb 4x) 320XE All with new keyboards and new old stock UK PSU's that I bought in 2007. One was my previous main setup installed also with 32-in-1 OS and VBXE2, SIO2PC 1x) 130XE My original XE bought in 1989 1x) 1050 My original drive that I bought in the mid eighties but now painted to match the XE in 2007 (the Atarimax Happy I bought in 2007 was never installed and is still in its box) 2x) 1010 1x) XC12 Everything has been carefully stored away except for my current 600XL setup.
-
I also have the SMD version of the UNO board so I'll look forward to building the small stripboard at the point when I hopefully also get the mini xf551 built so I can then use them both together. Will the fix with the SMD version prevent future firmware updates being performed via USB as it does with the DIP version without adding a switch to re-establish the 5v?
-
I guess everyone has their own personal preference with the keyboards. The type 2 AWC keyboard with the Futaba ML switches are IMHO preferable. I looked for and bought an 800XL recently with an AWC type 3 keyboard, they have the Cherry M8 open top switches, I specifically wanted to check that type out again as I've been interested to compare all the variants. My first impression using it again was that it was so-so but once it was cleaned and I used it a while longer they weren't such bad switches. The other variant of that keyboard that only Jon has seen so far has the rarer Cherry M8 closed top switches. I'm not too sure if the keycaps from the Cherry M8 will fit on the Futaba ML switches.

-
I'm very much interested in this also. Although I do have an XF314 or XF354 (I forget which) stored away, that XL style mini 1050 case looks great and would be nice along side my modified 600XL, I have a spare 720 drive mech that I could use.
-
Hi, I dismantled a couple of faulty Futaba ML switches early last year, they are easy to remove from the board but it can take some time to get them apart. I saw no obvious issue inside either of the switches and after sanding down the pins and using some contact cleaner they were still dead so I just simply replaced them (thanks to Jon). The keyboard did have evidence of liquid damage in that area so it was not surprising. One intermittent key elsewhere on the keyboard responded well to contact cleaner and it's all now 100%. Those switches and the Alps SKFL are by far my favorites.
-
Happy New Year to you all.
-
Is Drygol associated with this video?
-
Atari 130XE 4164 best replacement or upgrade RAM chips?
Tezz replied to E474's topic in Atari 8-Bit Computers
I'm about to do the Peterson 320K upgrade to a couple of 65XE's that I have here. It's been 11 years since I did the last one and I've had the parts and 41256 RAM for the others in storage ever since so it's high time they were put to use. Jurgen's 512Kb SRAM is another great option which I've installed in a couple of my XL's now although I'll make use of the parts for the XE 320K mod this time. -
Here's part 2 ... https://www.youtube.com/watch?v=eV1lacUcZk8
-
It will be interesting to see what Ben comes up with as he has simplified the glue logic with other builds. Indeed, the issue 5 and 6 of the original rubber key Spectrum removed six decoder/multiplexer chips being replaced with a Mullard ULA type ZX8401 and a 74LS04 hex inverter provided the six inverters required for the new neater design. The 6C001-7 ULA chip that arrived with the issue 4 onwards was also improved and works in most of the original earlier models.
-
I'm glad somebody noticed the grammatical typo. I posted the title quickly from my phone that day. Can admin edit the title please to add the apostrophe
-
Fixing a dead 130XE board, which bank of RAMs to fill first ?
Tezz replied to Level42's topic in Atari 8-Bit Computers
Thanks Jon, I couldn't remember and it was difficult to see whether they had a connecting trace or were bridged. After removing the IC I can clearly see the connecting trace now! I continued on and added a socket and a new PIA and the board fired into life -
Fixing a dead 130XE board, which bank of RAMs to fill first ?
Tezz replied to Level42's topic in Atari 8-Bit Computers
I was just about to remove the PIA from a black screen output 65XE.. I noticed that pins 37 and 38 (IRQB/IRQA) are connected together, are they supposed to be? -
https://www.youtube.com/watch?v=Uiw8LISBVj4
-
Thanks, I find these repairs really satisfying. Thanks, I was thinking about finishing it off with some UV curable solder mask, I certainly have the weather for it right now.
-
This one was also from a Taiwan 800XL and states 600XLKB on the PCB.
-
Great, thanks Jon
-
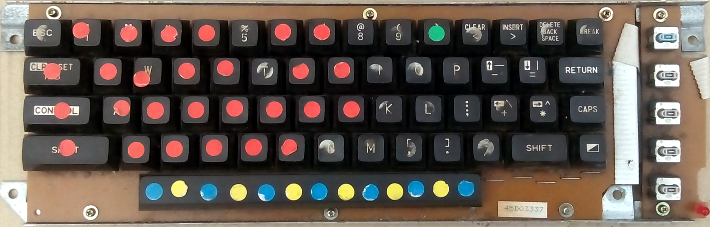
I'm part way through repairing an Alps keyboard that had been punched and broken in half by previous owners in the past. Here's the keyboard in the state it arrived in once removed from the case. The brackets were bent and the PCB was cracked. For some reason the keycaps were also covered in coloured stickers. You can see the extent of the crack from the underside of the PCB I removed a couple of switches and wire links so I'd be able to epoxy and clamp the board at it's worst point of damage I couldn't find my clamps so I dug out a small bench vice from the shed after applying the epoxy Once the glue had cured I scratched away the soldermask on either side of the breaks and exposed the traces. There was a chip in the laminate roughly in the centre but otherwise the PCB came together pretty cleanly. The next job was to tin the exposed traces and carefully add some strands of copper wire across the breaks. There's still flux on the board in the photo and a few traces left to be done. Everything then checked out on the multimeter. The keycaps cleaned up well and look perfect although I only noticed later that the plastic mount for the spacebar spring was missing... I found this photo online showing the mount on the bottom left. I don't suppose there's much chance of me finding one. It would be another good reason to buy a 3D printer Talking of 3D printing, the console key caps were not present on the keyboard, has anyone tried printing an Alps keycap before? I noticed online that some Alps caps have been modelled already. It would be great if someone was interested in modelling the console keys. I could fabricate the aluminium trim for the keys and anodize them but I don't have access to a 3D printer to finish the job.


-
The Zipstick was my overall favourite. The later microswitched Competition Pro was also good although most seem to favour the older model. I went through a few of those in the past. Last year I bought several joysticks that I didn't own back in the heyday to try them out for myself. The Epyx 500XJ and the Boss were both well made but their ergonomic design wasn't for me.
-
Any tips for diagnosing a black screen on an Atari 130xe?
Tezz replied to bernie's topic in Atari 8-Bit Computers
http://atariage.com/forums/topic/278661-announcement-sys-check-got-some-siblings/ It's possible to remove the ICs with a soldering iron (preferably temperature controlled) and a solder sucker although it's far easier with a dedicated desoldering gun, there's also no more stray solder bits coming out of the manual sucker to hunt and clean up afterwards. My usual method now is to remove the solder with the desoldering gun and check with a small screwdriver that each pin is freely moving, remember to add some flux to the pins at the start. If some solder remains on one of the pins (usually on the other side of the through hole), add some new solder and then remove again with the gun. If any pins remain stubborn I'll make the final removal with hot air. More often than not these days I'll just remove the solder with the gun and then go straight to the hot air to finish it off for a clean removal.


