
Search the Community
Showing results for tags 'Best Electronics'.
Found 12 results
-
 Both of the CX24 Proline joysticks that came with my 7800 years ago started showing signs of failure a few months back. Finally, a couple of weeks ago, I ended up with two sticks that were in varying degrees of being on their last legs. Some quick testing with the multimeter later, it was apparent that the joystick wiring was fine, but the PCBs had gone the way of all flesh. Anyway, I ordered a pair of CB103154 CX24 upgraded PCB replacement sets from Best Electronics. They arrived today and I installed them this evening; the following are notes from the installation, otherwise known as 'lessons I learned from doing this the hard way on the first joystick'. Tools: Philips screwdriver, long tweezers, Vise-Grips. Pretty much all of the work is going to be done inside the upper half of the casing. Remove the lower screw on the back of the joystick first, then the upper. Be sure to hold the case together as you do this. Separate the case halves carefully so that the fire buttons don't go springing off into never-never land. RESIST THE TEMPTATION TO IMMEDIATELY REMOVE THE PCBs AFTER CRACKING THE CASE OPEN. NO NO NO NO NO DON'T DO IT BAD BAD BAD. Now go ahead and replace the fire button PCBs one at a time to avoid confusing which one is the left button and which one is the right button. Don't pull the joystick PCB out completely to remove the wiring; do it with the PCB in-situ. This helps with avoiding the really fun time you'll have later with recreating the braid they were twisted into to route them correctly if you should happen to untwist it, and also leaves the terminals routed to where they need to be anyway. Separating the joystick from the shaft: grab the ball end of the shaft with a pair of Vise-Grips, doing your best to not crush it. Twist the Vise-Grips and joystick knob back and forth in opposite directions until you feel the joystick start to free up from the shaft and begin to twist easily. Now pull them apart, putting the pulling force on the joystick knob, not the Vise-Grips. Pride yourself on avoiding making double entendres involving all of the equipment (fnarr!) mentioned in the previous step. Swap out the joystick PCB. Reinstall the joystick, but don't put the knob back on yet. Making sure that you're not pinching any wiring (the long tweezers come in handy here), reassemble the two halves of the casing. The fire buttons can be fiddly to keep in place during this process. Go play with your rejuvenated stick to make sure it works properly. If it does, you can put the knob back: just slide it over the shaft until it feels like it won't go any further, then give it a good press straight down through the shaft. You'll know for sure when it's in there all the way, and it'll be ready for hours and hours of fun.
- 4 replies
-
- 4
-

-
- 7800
- proline joystick
- (and 3 more)
-
 Greetings, Atarians! I always enjoy a good "mod log" that shows someone's efforts in tweaking their console to be something BETTER, and so I thought I would share my 7800 project that I wrapped up a week ago. I personally find "mod logs" to be helpful inspiration or good instructions for my own projects. Some of you may be considering the mods that I used on this project, and so you can also look at this as a "mini-review" of these mods. I took a stock 7800 and made the following mods to it - - - The "European OS mod" supplied by BEST ELECTRONICS - Composite and S-Video mod board sold by our very own LittleJoe, and based on the Longhorn/batari board model - A "disconnect" switch and case mod to clean up video interference on the video mod - The simple compatibility mod with a switch for those 2600 carts that don't work in later revision 7800 models - A clean, new old-stock ATARI 7800 metal case label The Base Unit I started with a basic 7800 that had the solder points and hole in the side of the case for the expansion port, but no expansion port . . . The European OS mod from BEST ELECTRONICS Best Electronics in California sells a "kit" that you can use to modify your 7800 to use the European version of the 7800's operating system http://www.best-elec...m/7800.htm#euro Highlights and advantages of that mod include - - - No logo boot screen; goes right to the inserted game without delay - Built-in ASTEROIDS game when there is no cartridge inserted It's a relatively complex mod, requiring the removal of the current OS chip, which is soldered directly to the board, replacement with the new European OS, and then a tricky "piggyback" procedure with another integrated circuit where you basically solder a chip provided in the chip onto ANOTHER chip on the board. If you are comfortable with soldering, it's all straightforward, just time consuming. They even provide nice "extras" like shorter case screws to use when you re-assemble your console, which helps prevent breaking the plastic case - - some older 7800s can have brittle plastic, and if you overtighten, or sink the screw too deep, you can crack the threads or case! Here's the instructions that came with the kit, if you want to peruse the step-by-step and see if you want to tackle it! BEST ELECTRONICS 7800 Euro OS Mod Installation Instructions.pdf And, here's the highlight shots of the process - - Last glimpse of the original board before it underwent the knife Original OS chip desoldered (note that I keep flipping the motherboard around while I work on it, and so you will see the placement of components jump left and right in the pictures!) New IC socket in place, and new Euro OS chip inserted The "piggyback" IC completed (first picture) and the 30-gauge Kynar wire jumper that goes THROUGH the board and runs to another chip in place (second picture). The NEW socket to the left is for the video mod, which is coming up after this section! And those were some of the highlights minus a few other steps! When you fire it up, ASTEROIDS for the 7800 pops up right away! It REALLY is a straightforward mod. BEST ELECTRONICS' instructions are very detailed and thorough. Again, check out the attached PDF where you can preview the details of the work. I really like not having to wait for the "splash screen" while games are booting, and the added plus of the built-in ASTEROIDS games is fun! I was curious about PAL games on this unit, since now it would seemingly be "PAL-compatible" with a Euro mod, AND not have copy protection on it, which was a feature that was left out of the PAL models. PAL copies of some 7800 games are some less expensive, too! Someone here on AtariAge had that same question, too - - http://www.atariage....cs-euro-os-mod/ SO, I asked Bradley over at BEST ELECTRONICS to see what they knew. This is what he replied with - - "Q. As you well know, the NTSC 7800 has a region lockout for PAL games. With the European mod in place on an NTSC unit, does that mean I can then successfully use PAL cartridges? A. Good Atari question. Never been asked that Atari question before. I had to check our Atari 27+ Atari Super Tech to get you an answer. He said that most Atari 7800 PAL games will run on the 7800 with the Best Composite Video mod with the Euro OS upgrade installed. But some 7800 made PAL games with Text at the bottom of the screen was hard to see (because of the 50/60 Hz screen display differences). The Atari PAL 7800 games our Atari Super tech had, Choplifter, Basketbrawl and Sentinel did have video blanking problems and were not playable. A couple more played fine but had sound problems. All of the other Atari 7800 PAL games tested fine with full sound and normal color (normally on a NTSC console with PAL games you will get a black and white display) with no normal 50Hz (played on a NTSC 7800) video rolling screen." Interesting! I have not personally tried it yet, however - - I was bidding on a PAL lot last month, but the pricing got out of hand, and I backed out, and have not pursued any other PAL carts since then. I will likely get around to it here someday! I don't know about 2600 PAL games - - I would assume they will roll, since the 2600 component of the 7800 is separate, and not PAL! Also, I have not YET run into any compatibility issues with 7800 games on the Euro OS, but I'll update this thread if I do! So, there you go! I give the Euro OS mod "two thumbs up" and would recommend it highly! LittleJoe Video Mod based on Longhorn/batari Model Now with that done, it was time to move onto the video mod. Our very own AtariAge user "LittleJoe" is selling some excellent 7800 and 2600 video mod boards based on the classic Longhorn/batari design His website - - http://www.electroni...entalities.com/ He's a great guy to deal with, and really goes out of his way to help you out if you need it! I had some (self-created) issues with my 7800 board initially, and he was super-friendly and fixed everything up for me! The video mod board is really handy - - it is made to just socket right into the 7800 motherboard after you remove the IC that is there and put in a socket, which is provided in the 'kit". Here's the NEW socket in place, ready to accept the video mod board - - Here was my problem, though - - see that chip to the right of the socket? That's used with the European OS mod for the "piggyback stack" and once that second chip is in place . . . it's too high to socket the nice 7800 video mod board in like it should be! My first solution was to stack a SECOND chip socket on the first one . . . TO make a long story short, that solution and a few others I tried didn't work, and finally somewhere during my modding process, the 7800 video mod board stopped working correctly! Basically, I lost the video output, and was only getting sound. I contacted LittleJoe, and he kindly offered to look at BOTH my board AND the video mod board. A few weeks later, he sent it all back, and had made a 7800 video mod board with LONGER pins and a secondary socket so I could socket it right into the board with no interference to the Euro OS mod! Perfect! Some jacks installed on the side of the 7800 case, and I was ALMOST ready to go . . . (Note: I didn't show it here, but I always epoxy in the backs of my audio/video jacks to make them rock-solid and prevent backing out. I highly recommend it!) I say ALMOST because there was a bit of a video issue that the perfectionist in me wanted to clean up . . . ! Add-on Disconnect Switch for TIA 9 on the 2600 Circuit of the 7800 Video Mod Turns out the TIA 9 line causes some interference to the 7800 when it is running in 7800 mode, and the best way to deal with it right now is to just turn off/disconnect the TIA 9 line while you are running in 7800 mode (it was discussed here: http://www.atariage....s-on-video-mod/). The video mod board actually switches "off" the TIA 9 automatically, but the automatic switch is a little "leaky" and the interference still comes through. NOTE - - this interference is the sort of thing that only a video and audio FREAK like me is really going to notice! It's only slightly visible on pure black screens, and I feel you have to be looking for it. This "additional" mod is purely optional, but I like to do things 100%, so I went for it! I think that LittleJoe's video mod is EXCELLENT in it's current form, and this to me isn't a negative in any way! It's just the way it is out here in the wild-west of vintage gaming mods . . . ! So, the TIA 9 input is where the blue wire coming off the LOWER LEFT of the board is in this picture - - Usually you just wire this point directly to TIA 9, but what you need to do for this mod is put a SPST (single pole, single throw) switch along that line, and flip it to "disconnect" when you are getting your 7800 mode on. Easy! Finding the right switch, however was a bit more challenging. I settled on a classic RADIO SHACK SPST "soft touch" in black and red, which I thought matched the classic stylings of the 7800 - - Pop a hole in the case - - Wire it up (I used some heat-shrink tubing to cover and clean up my spliced and soldered wires) - - I put the switch right under the "lip" of the 7800, where it has easy access, but doesn't visually affect the look of the console at first-glance - - Console flipped upside down to you can see how well the plastic matches - - And, of course . . . LABELS . . . ! I guess secretly I want to be Captain Picard, as I appear to have used the word "ENGAGE" . . . a subliminal slip? One last mod before we button up the case . . . Compatibility Mod for Certain 2600 Games on 7800 Console It's been covered before in detail many times here on AtariAge, but basically some 2600 games will not function on later revision 7800 units because of a motherboard change that ATARI made . . . in order to accommodate a 2600 cartridge . . . ! They were apparently trying to make the 2600 version of DARK CHAMBERS compatible with the 7800, and broke things for other games along the way. The simple solution is to disconnect a resistor on the board, and then if you want, put a switch on it . . . so you can restore compatibility for ONE 2600 game . . . I know, overkill, right? Well, I wasn't using the CHANNEL SELECT switch anymore (yeah, S-Video!) and so I decided to use that as my switch. First, disconnecting the single necessary resistor and solder a wire to it (it's the BLUE wire in this picture; the others are for the 7800 video mod and Euro OS mod) - - Add some heat shrink tubing for cleanliness and short protection - - The handy, already-installed switch for use - - You need to disconnect the switch from the ground plate of the motherboard in order to use it, so cut traces on the bottom and top (bottom is only shown here) - - Good to go! Yes, overkill, but hey, we're shooting for 100% Finishing Touches So, with all that done, we can close up the case and . . . oh, wow, that metal label looks horrible and scratched! No worries, BEST ELECTRONICS to the rescue again, with a FRESH old-stock metal label for application! First, you of course need to tear it off, and remove the old adhesive - - A bit laborious, but the final result looks GREAT! I'll take that protective plastic film off the metal label someday . . . maybe . . . WELL, that's it! I hope you have enjoyed it, or have gotten a few ideas from it. I don't really feel this is done 100% - - I need to "fix" the cartridge slot so that there is not the issue with 2600 cartridges fitting too tightly. I was hesitant to cut up the cartridge connector at this time, though, so I will save it for another day . . . or build or obtain a "cartridge extender!" Thanks for reading! -atari2atari
- 51 replies
-
- 3
-
-
- Euro OS
- BEST ELECTRONICS
- (and 1 more)
-
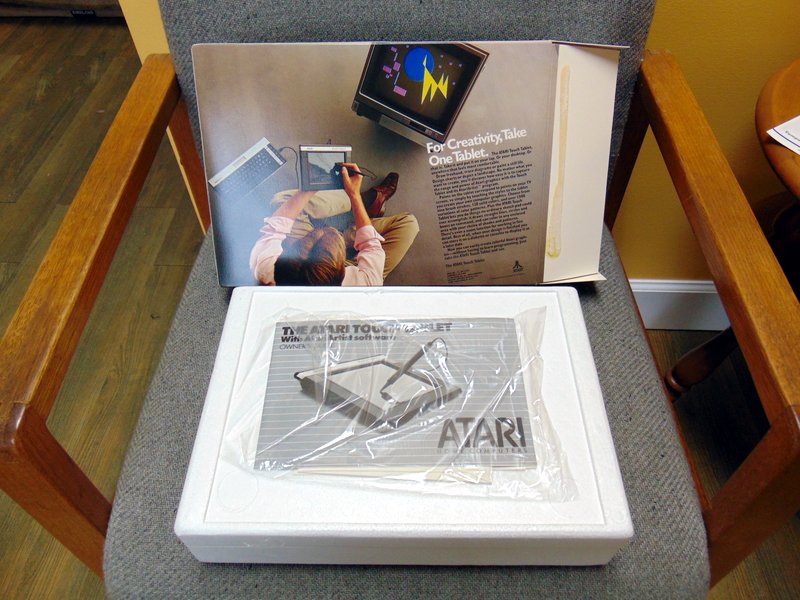
It was 1984 when Atari introduced us to their CX-77 Touch Tablet, which at the time was pretty amazing. Or at least I thought so . And when first introduced, it could be bought as a bundled package consisting of the CX-77 touch tablet, a stylus, the Atari Artist cartridge, and a formatted DOS 2.0s 5.25" floppy system disk, all for the price of $89.95. So after stumbling across an AtariArtist.xex file the other day, I loaded it up and what I saw looked pretty cool, although I couldn't do diddly squat without the touch tablet. So being curious as to what the 1984 experience would have been like, I set off on a mission to find one of these on eBay. But every single one I came across was either pretty beat up, or in the case of one being sold as Brand New, they wanted way too much money for it in my opinion. Next I decided to do a search at BEST Electronics to see if they perhaps had a reconditioned one for a more reasonable price. My search quickly led me to a page about joysticks, paddles, light guns, and low and behold a blurb about Brad having sourced some NOS CX-77's that had been stored away in an old warehouse in Holland. Apparently he had bought every one that they had, and was offering them for sale on the BEST website. But before I got too excited, I took note of the original copyright date on his website page, which was 2002 (although it also stated: This page Last modified: January 12, 2018) LINK. The price was being advertised at $49.95, which seemed too good to be true. So I contacted Brad and asked him if he still had any of these left, and if so, how much were they going for now. And here was the price break-down he emailed me... Wow I thought, that sure beats the pants off of the new one being sold on eBay . So I bought one . And here's it being un-boxed and tested. The tablet and the program work very well together, and as I used it for a bit, I was also impressed with the fact that the pen position on the tablet was relative to it's position on screen. Not having used one of these before, I had previously thought that it was going to be more like a mouse, and not really positionally accurate. I really feel like this was a great deal, and well worth the money. Also it was the first time in over 30 years that I got to open a brand new sealed Atari product, which kind of took me back in time . - Michael


-
Hi everyone, I was in need of a couple of CX22 replacement fire buttons, so I contacted Best Electronics and found that they are "down to the very last of them". As such, there is a limit of 2 per customer. If you own a CX22, you better act now, as the shaft on these buttons tends to break over time, from normal play. BTW, my transaction started with an brief email request and concluded with a 5 minute phone call. Everything was handled over the last 12 hours (Brad actually responded to my email yesterday, Sunday, which I was not expecting ) and the entire transaction went very smoothly, which has always been my experience. Say what you want about their website, but IMO, Best is still the best!
-
I'm trying to restore the 1200XL I found in the trash years ago. The keyboard was nonfunctional, so I ordered a replacement Mylar from Best. I cleaned the PCB and key caps, reinstalled everything, and...nothing. Just the reset key and maybe one other key worked. I installed the included thin wafer with gold contacts that goes between the Mylar and the PCB and this time, the O key was stuck on; a few other keys worked but not many. Best says not to remove the layer of carbon that's built up over the gold PCB contacts that make a connection with the circuit traces on the Mylar, but I'm wondering if that's the weak link in the equation. Any suggestions for what to try next?
-
 I had to repair the very 7800 console Best sent me 3 years ago. Folks, professional AV modding does not mean leaving a cheap AV cable hanging out the end of the system. Closeup shot of the mod circuit: I kept a foot of the old cable because I didn't want to risk damaging that delicate circuit with components just sticking off the board.
 -
 Hey there everyone Some of you may remember my various threads from last year about all the Atari 2600 systems I've purchased that broke down on me. For those that don't, the short version of the story is that I've owned 6 different Atari 2600s over the past 3 years or so; all of which were purchased either brand new or in like new condition and promptly broke down in one way or another within a few months of use. I loved playing and collecting for the Atari 2600, enough so that I ended up logging 10 to 20 hours a week every week playing my systems during the time that I had them, but eventually I just got too frustrated and fed up with my bad luck with systems (because buying a new condition Atari every few months isn't cheap, even after reselling the broken systems for parts) and ended up selling off my entire collection of $1,400 or so worth of Atari games and accessories. I loved playing Atari, but I just didn't want to have to deal with the constantly breaking systems anymore. It's been about a year since the mass liqidation of my collection, and honestly I really miss it. I've still been playing Atari via emulation on the Wii, but it just doesn't feel the same or give me the same sense of joy that playing with a real collection of original cartridges did. So at this point I'm strongly considering getting back into collecting and playing with real Atari 2600 hardware again, but after all the bad luck I've had with system reliability in the past I'm feeling a little wary of buying any more systems off eBay and leaning more towards buying a reconditioned system from Best Electronics. Now to finally get to the point of this thread, as you may have gathered from the backstory I'm a wee bit obsessive about the cosmetic condition of the systems I buy. I am definitely interested in the possibility of picking up a reconditioned system from Best, especially since they come with a 90 day warranty and I know with my luck that if it is possible for a system to break then it will find a way to break on me within the first few months of ownership. The only thing I'm concerned about is what the cosmetic condition of Best's reconditioned systems is like. Specifically I'm interested in getting a Light Sixer and wondering if it will come with a new scratch-free casing and whether or not it will have the original orange bezel paint either fully intact or repainted to a nice clean like-new appearance. I don't particularly care whether the bezel paint is original or restored, so long as it is 100% intact with no signs of wear. Has anyone here ever ordered a Light Sixer, or any other Atari system for that matter, from Best Electronics? If so, what was the cosmetic condition of the system like when it arrived? Did it appear like-new or were there external flaws? Any customer feedback would be greatly appreciated!
 -
 Before I jump to a downgrade to a 2600 Jr with short rainbow and an a/v mod (also being lured towards it by the wonderfully done Pac-Man 4k and due to a lack of a Yars' Revenge 8-bit port), my 2 5200 trak-balls (yes, I said it, two, trak-balls, model no. CX53) that I've had since 1983 (both purchased just a couple of months after taking delivery of my first 5200 unit on my 17th birthday (USA-Made 4-port, Serial No. 141101, now retired after getting an a/v/power-out modded 4-port unit just 2 months ago) in 1983 seem to have a serious issue going on with (yes, you guessed it!) the keypads and fire buttons not working at all, and I really wanted to use them with Tempest and of course the CX53 is also the ONLY one that will work with games like Missile Command, Super Breakout and Gorf, but alas these three games cannot be played with the 2600 trak-ball I picked up (the fire buttons are more responsive on it than the CX53) because it reads through my Redemption 5200 as a digital unit on these games (Missile Command, Super Breakout and Gorf all take advantage of the analog system the stock stick uses), but yet, that very same setup reads beautifully with games like Centipede, Millipede, and also Tempest. Does Best Electronics offer circuit-board and/or keypad/fire button upgrades for the CX53 trak-ball controllers like they have for the stock 5200 joystick controllers, as I have a gold-contact 5200 stick which is a thing of beauty, but I don't want to throw in the towel and sell a system platform that I have supported for 33 years and also spent thousands of dollars in games and accessories, including the 2600 and 7800-compatible Redemption 5200 units and almost all the great homebrews and finished prototypes over the years. I hope they do, because I don't wanna throw away such a great system just because of a mere snafu involving the CX53 Trak-Ball Controllers, somebody help!
 -
So, my 5200 didn't even come with a CX52 controller, I found one at the local play and trade. I opened it up last night and gave it a good cleaning, but it's still a little spotty. The joystick works great, but the bottom left fire button is dead. The # and * keys oddly work for some games and not for others, and though pause and start work, reset doesn't seem to do anything. I found it really easy to take apart the joystick and clean everything, but I don't know how to solder (I know I need to order a kit and learn.) Eventually I'd like to have two fully functional CX52's to use for mutliplayer with friends and games best suited for analog control. I'm wondering if I should: 1. Order two fully refurbished controllers from Best (More expensive option at like $60 a pop or something similar) 2. Restore them myself: order the gold components and new buttons from best and try to do it myself. The buttons are easy enough. My main concern is where the circuit pad goes into the white receptor. Is that like a ribbon cable I can pull out or is soldering required? I just don't want to get in over my head if it's above my skill level. Anyone done this themselves before and have the skinny on what it actually takes? Thanks for your thoughts.
-

From the album: Accessories
-
I was just checking out Best Electronics for an RF cable and they sell one with an RF Toriod. I haven't seen anyone taking about it, does it work to clean up the video? Does anyone else have one? http://www.best-electronics-ca.com/power%20guide.htm
-
I noticed that best-electronics-ca.com is selling refurbished Lynx decks for around $45, which seems pretty straight to me. They offer both the Lynx I and II. Does anyone have an opinion as it which one I should get? Personally, I think that the first model looks cooler.


