
Search the Community
Showing results for tags 'GamePad'.
Found 23 results
-
 Looking to refurbish an NES gamepad found in the wild recently, the silicone pads are worn out (some are torn). I need to replace them, seeking recommendations on quality reproductions that have good tactile feel and quality construction. Some candidates: AliExpress Console5 trusted ebay or Amazon marketeers If you have a recommendation on a favorite source for these components, I'd like to know
 -
 Hi, Is it possible to have a virtual keyboard on the atari800 emulator on the GamePad, running under RetroArch (on a softmodded WiiU). I saw a comment on a WiiU video on YouTube (ages ago) that this was possible, but didn't follow up with the question of how to do this. I assume it's a configuration file setting, if it's even possible, as there is nothing in atari800's UI to do this. I'm running atari800 3.1.0 (b59fb7e), which is the latest version in the WiiU RetroArch (AFAIK). I think I can plug in a USB keyboard to the WiiU, but having a virtual keyboard, as used by most tablets, would be a bit easier. Anyone know anything further? TIA!
 -
 Alright, who with controller modding/building experience and a 3D printer want's to make this happen? ? I'm a sucker for matching, and there are quite a few XE games that just play better with a joypad over a stick.. but there aren't really any controllers that match the XE/ XEGS... so I designed this abomination! And with a 3D printer + the guts of a Sega Genesis controller, the dream can be a reality.. oh.. I'm the only one dreaming of this? ? But seriously. If anyone has the time and skill to make something like this, let me know your price!
-
Hi guys, I've got an Ultimate Intellivision Flashback, which is a Flashback that has the internals replaced with a Raspberry Pi, and have never had any problems with it. However, this week it suddenly started coming up with "No gamepad detected" when I boot it up. I'm just using the standard Intellivision Flashback controllers (as I always have done) so I don't understand why it's suddenly stopped recognising them. I've tried pressing 0 on the controllers to try to get them to register with it, but nothing happens. Does anyone know how I can get it to recognise my controllers again? I'm trying to take part in this season's Intellivision HSC so you can understand how urgent this is!! ? Edit: BTW, I've checked the internal connections and it doesn't look like anything's come loose. Any help will be much appreciated. Many thanks, gezkc
-
 I've come up with some new ways to use Switch Joy-cons on the Atari 5200 Console (as well as other Atari consoles), and there's some really good news about the two stick games, Robotron 2084 and Space Dungeon. They feel great being played with thumbsticks. The two stick method requires that you'll need to purchase the following items: 1) Two Ikonsgr74 (Ebay) 9 pin to Atari 5200 controller adapters 2) Two 8bitdo Retro Receivers for the Sega Genesis 3) Two cords around 5 to 8 inches long that have 9 or more internal electrical wires 4) Two Male 9 pin solderless connectors (db9) and two female 9 pin solderless connectors (db9). 5) Nintendo Switch left and right Joycons with Grip/recharger. After you have these items just follow the instructions I have for you here (explained midway into the presentation) to get it all set up (soldering a wire onto the board of the 2020-released Ikonsgr 9 pin to 5200 adapter is required):
 -
If any of you have wondered about whether the Hyperkin Ranger could be modded into a two button controller for Atari 7800 compatibility- well, the day has come for that to become a reality. I came up with a way to pretty easily accomplish this, and I did it with a Nintendo Switch Joycon connected to the Ranger. It was done without using adhesives or drilling holes in controllers, so you can rest-assured there won't be any damage done to your favorite controllers. My tutorial video and review of the Ranger with footage of Dark Cavern and Kaboom! is found here, so check it out:
-
Hi guys! I and my friend decided to bring something new to you. The joystick. But we need some feedback before it. Description: We decided to find out a way how to make new Atari Joysticks and similar joysticks with 3D printer. We try to have as similar as possible construction for the same impression of playing games like the original old joysticks. But we have one thing in our construction different. Our Stick will be exchangeable and modulable. We will have more types of sticks and you can choose what type you want. Sticks will have different shape, size etc. Our questions are: 1) Is this idea interesting for you? 2) Are you looking for some new joystick because your old was damaged? 3) What types of sticks do you prefer? What joysticks do you like? What was your favourite joystick in 80/90's? ( CX40, QuickShot etc. ) 4) Would you like exchangeable stick at your joystick ( when you will get tired of the old type of stick you can simply change it for another one ) or you'd rather buy another new joystick when you want to exchange the stick? 5) Is the autofire function important for you? 6) How long stick movement do you prefer? ( short movement is like pressing a small button, long movement is like pressing a key on your keyboard ) 7) Do you like an idea that you can buy only the 3D data for your 3D printer and make it for your own? 8) Do you have some tips why this idea doesn't make sense? For example you can buy really new QuickShot on Ebay etc. Progress: Thank you for your time, sharing and answers! Best regards, EnJoyStick Team


-
There's been a new discovery and I'm here to explain how to get certain Atari 2600 and 7800 controllers to work on your Atari 5200 for a pretty reasonable price. The 2600 and 7800 controllers will only be working on 5200 games that have a single button involved in the gameplay, not two. Also, I need to point out that the games that require analog movement (ie. Breakout, Kaboom, Missile Command) can't be effectively played with the 2600 and 7800 controllers. First, you'll need the PC gameport to 5200 controller adapter (the one I have is made by fellow Atariage resident 5200 expert, bohoki, and it's a good design at a quite reasonable price). If you own one of these, you will want to get a PC joystick and/or gamepad with two buttons to go along with it (to play games which require two buttons like Defender). The schematics are available online if you choose to make one on your own. Secondly you need to buy an Atari 2600 to PC gameport controller adapter (schematic is available if you pm me). This adapter is currently made available on Ebay by ikonsgr74. Here is the current Ebay listing: http://m.ebay.com/itm/AMIGA-ATARI-AMSTRAD-COMMODORE-DB-9-PIN-JOYSTICK-ADAPTER-DB15-PIN-PC-GAME-PORT-/111807334682?nav=SEARCH The two adapters can be connected together allowing for a 2600 or 7800 controller to be put into use for games which have compatibility with digital controllers. This is going to essentially give you something kinda like a Masterplay Interface adapter, but with a couple downsides. 1) The original Atari-made 2600 joysticks, paddles, and trackballs that I've tried are incompatible. The heavy sixer CX-10 could work, though. I don't own one of those. Wico bat handle sticks are incompatible. I have 4 or 5 Atari-made/Wico-made joysticks and a single trakball and not one worked properly. 2) Even though you'd think it'd work with Genesis controllers, it's not compatible. I've been looking for a workaround but have come to the conclusion that the design of the 2600 to PC Gameport adapter is preventative for getting the power to the Genesis controller circuit that requires +5 volts (and that includes attempts to use an Edladdin Genesis to 7800 conversion cable). If you want to hear any details of my attempt to wire in an external power supply, pm me. 3) If you have a Pointmaster, Spectravideo 2 button, Quickshot 2 Deluxe, or Colecovision controller you were hoping to use, you'll be disappointed. The upsides are: 1) One controller that works and works well is the Slik Stick which is a favorite of mine. 2) it not only works with an Atari-made 7800 Proline controller, but a couple of my NES-to-7800 conversion controllers (converted NES Epyx 500xj and a converted rectangular NES controller). I figure it'll also work with the rectangular Atari-made European pad, too, but I don't have one to test out. You get single button compatibility out of all of them. 3) Sega Master System gamepads and Control Sticks work and work well for single button games. (But not the Sega Sportspad) 4) Wired controllers made for the Atari Flashback 2 system work and work well. 5) Sears Video Arcade II joysticks (not the paddle part), Gemsticks, Mindscape Power Player trigger-joysticks, Epyx 500xj, and Coleco Gemini joysticks (not the paddle part) all work great. Well, there you go. It's not exactly a Redemption adapter, but for less than $30 you can enjoy many 5200 games with a reasonably good number of controllers. I never got an opportunity to use a Masterplay Interface (or a Redemption adapter for that matter), but now I'm seeing the true value of what many have come to appreciate before me... and it didn't cost me an arm and a leg! If you're concerned about whether it's safe for your game system, I will say that nothing bad has happened to my 4 port system over the past couple months of hot swapping various controllers into the connected adapters with the 5200 on. If you haven't tried 2600/7800 compatible controllers on your 5200, you now have a great opportunity.
-
Well, I've done some more experimenting and have managed to find a way to attach wired PS3 and Xbox 360 controllers to the 5200 to play the games that offer digital controls (as opposed to the analog-only games like Missile Command). This required a number of video game controller adapters/cables and a USB power supply. Here's how it's done: The adapters needed to get the wired PS3 controllers compatible with the Atari 5200 are as follows: 1) a 15 pin PC Gameport controller to 15 pin Atari 5200 adapter. These are obtained by contacting Atariage member, bohoki. He makes these for under $20 (shipped within the U.S.). 2) An adapter that converts Atari/Amiga/Sega controllers with a 9 pin connector to a 15 pin PC gameport. These are available on Ebay from "Ikonsgr74" and can be obtained for under $20 (shipped anywhere in the world). 3) A Tototek Joypad Convertor version MD (for Playstation controller compatibility on the Megadrive/Sega Genesis). These adapters are under $30. 4) A Brook Game Controller Super Convertor for adapting a PS3/PS4 controller to a PS2 console. These can be had for under $40. 5) a USB splitter cable ($12 or less). 6) a powersupply with a USB cord (5Volts) OR a USB Hub with connected power supply. To get the Xbox 360 controllers compatible with the 5200, you'll need one additional adapter. It is the Mayflash Universal Adapter for Xbox360/PS3/PS2/PC USB. These may be found at Amazon. Current price for these on Amazon is $30, but that is subject to change. Mayflash adapters tend to become scarce and go up in price. If any of you have interest in a video presentation on this (as well as a quick explanation of how to fix a potentiometer controller problem) here's the link for that:
- 2 replies
-
- 2
-

-
- potentiometer
- controller
- (and 8 more)
-
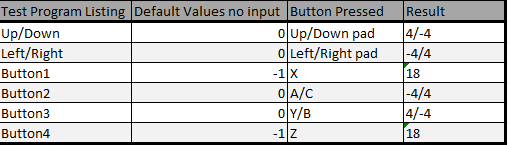
This is a 6 button 8 directional gamepad for the TI-99/4a natively. (No Adaptors needed) It's meant to be a D.I.Y. project. Total cost to me was Aprox. $19.00 US for 2 gamepads and 20 diodes. Controller Source - https://www.amazon.com/gp/product/B00EAM862S/ref=oh_aui_detailpage_o02_s00?ie=UTF8&psc=1 Diode source - https://www.amazon.com/gp/product/B005T6Q3RE/ref=oh_aui_detailpage_o01_s00?ie=UTF8&psc=1 I don't know who created the original schematic, I find it all over the web. But the original in the upper left of my picture below is of a 2 port atari adaptor for the TI-99/4a created by someone else. Same goes for the pin out diagram for the TI side including the 2 db9 pictures. Add to that other materials used (solder, wiring, glue) for pennies PLUS time and you have yourself 2 TI-99/4a Gamepads, one for each console. If I were asked to build one for someone, I'd ask for $20 $40 per joypad completely modded as shown. I had to up the price because it takes me a couple of hours to complete a mod on one Joypad including setup and breakdown times. I highly encourage you all to do this MOD yourself but if you really want me to do it for you, I have to ask for more money due to time. Looking at the attached picture will show you how I did this with the materials I had. I'll give some notes here: 1. Plan ahead with your own drawings that you understand. Your wire colors may differ depending on the controller you go with. Test them all and make your own chart for pin#, colour, board location.You'll want a controller that has all 9 wires to be certain. Sega Genesis controllers are like that as far as I know. 2. Test every wire and connection from the cable end to the connection ends as you go along. Check all solder points and pad connectivity as you go. One at a time. 3. It's easiest to do the Joy1 and Joy 2 connections first since they do not have diodes associated with them. 4. Be sure to isolate all traces. I used a dremel to obliterate the logic chip in to dust and cut all the lines. I isolated each solder point the gamepad already had and made sure joy1 and joy2 check lines were isolated from each other. review the photo and follow the traces. It should all make perfect sense. 5. I used Hot Glue to hold things in place and I applied it as I went along ensuring I isolated all possible shorts (using hot glue as an insulator). 6. I also drilled holes next to all the already connected wires on the board to allow me an easy path for my connections. You can see the unused holes in the picture for lines 1->7 and 6->5. 7. I was fortunate that the gamepad board had exposed round pads of bare solder. I suppose those were for Q/A testing. I drilled holes next to the ones I needed for new connections. I had to scratch the enamel off the common trace for J1 Signal sitting in the middle of the 4 directionals due to lack of circle solder pad. You can see the circle pads I soldered to, there are a few unused. Look at the ones near the middle buttons that went unused in the picture below.... 8. Be careful not to short any bare wires, be aware not to close holes that were there already (for encasement pins) and of course be aware of your drilled holes when applying hot glue if you choose to mimic my method. 9. I borrowed a program from another Topic thread to test. There was a typo in the original, find it and fix it. - Source = http://atariage.com/forums/topic/166557-proplay-new-4-button-gamepad-for-ti/?p=2058171 Already fixed and slightly customized code. Note: I think it's inefficient for game controller code but works for testing. My Test Results. 10. Use it as intended. - You can certainly use this gamepad as a single player Joy1 for any existing games you have. OR play two player games on one gamepad.(WHuh?Why? I know) However; the joy 2 buttons are just that, for Joy 2. So if you press them in conjunctions with Joy1 buttons in a game such as PARSEC (pressing up on both Joy1 and 2 at the same time) it will allegedly cause glitches or something undesirable (no damage just in game controller glitch). Don't blame the joypad. If you connect two TI joysticks and did the same thing, you'll probably get the same glitches. It doesn't make sense to use the controller in this way for existing games that aren't coded for this. 11. Further modifications were necessary. The bottom half of the controller housing has cylinders molded in to fit flush against the PCB. I needed to give 'em a little shave with the dremel to fit the wiring and hot glue. 12. Don't hold me responsible if you destroy the planet by attempting or using this modification. Or even if you break your console or something less destructive than destroying the entire planet. I knew the risks and now you do too, If you follow these instructions, any part of them, in real life you do so at your own peril. Just because it worked for me....doesn't mean it'll work for you in the sense that it could have been my fault. Last but not least. You will need games specifically coded to work with the full functionality of this controller. The game pad directionals and the X button are the Joystick 1 directionals and fire button. Y/B/A/C/Z buttons are for Joystick2 as follows in same order Up/Down/Left/Right/Fire. I attempted to make my connections standard. So anyone who wants to make their own 6 button gamepad for the TI to code for, please take in to account the button assignments. Together we can establish a new standard in TI gaming and ensure our programs work across the board with any controllers folks my make on their own utilizing this Topic Thread,. THE START BUTTON IS UNUSED AND DOES NOTHING. Of course, I rate this project as easy for an ametuer. But do ask and learn, I used a heat sink for every solder point to protect the diodes. I don't know it that's unnecessary, but I did it anyway. Thanks to everyone here for encouragement and help. Now it's time to start making games that can take advantage of this design and layout. Get creative. Street Fighter? Tanks game where you can move one way and rotate the turret another? Puzzle games where you have to control 2 characters to solve the puzzle ? (Castle of Dr. Creep anyone? - (C64 game) or The Goonies?) RPGs with spell, attack, defend, jump, dodge buttons? What would you like to play on your TI with a 6 button gamepad? Make it, Code it, Play it. Share it. Do it.


-
There's now a way to make 80s and 90s PC joysticks, steering wheels, and gamepads compatible with the Atari 7800 one and two button games. For the one button games all you need is this adapter: https://ebay.us/ON1DA8 For the two button games three adapters are required: Adapter #1: Edladdin Seagull 78 Adapter #2: Sega Master System Rapid Fire Adapter Adapter #3: 15 pin PC controller to Atari/Amiga adapter made by Ebay seller Ikonsgr74 Also included in the presentation is a unique way to play Robotron 2084 with combined gamepads. Enjoy enhancing your 7800 games.
-
I have figured out a way to use adapters and a powered USB hub to get Sega Master System and Genesis controllers compatible with the Colecovision 2 button games. In the presentation I use the controllers to play Rock 'N Rope, Space Fury, Cosmic Avenger, and HERO. The adapters and cables used are not hard to locate online, so this can be accomplished by anyone who'd want to get their favorite controllers fully compatible. Check it out, and subscribe to my channel for more controller fun:
- 5 replies
-
- 4
-
-
- Master System
- Genesis
- (and 3 more)
-
I've managed to have success getting adapters plugged in to the Colecovision for the purpose of getting Playstation controller compatibilty. Watch the experiment in action here: Here are the adapters you'll need: 1) 9 pin Sega Genesis extension cords (2) 2) Edladdin Seagull 78 controller adapter (converts Genesis controllers to be fully-compatible with the Atari 7800) 3) Tototek Joypad Converter version MD (converts Playstation controllers to be compatible with the Sega Genesis console) 4) PS1 Multitap 5) Speedlink Redeemer Beyond Total Control Playstation 2 mouse/keyboard adapter 6) powered USB hub with power supply The method: 1) Plug in a Colecovision controller into port 2 of your Colecovision (consider connecting a 9 pin extension cable to it in case you want to sit a little ways away from the console.) 2) Plug a 9 pin extension cable into port 1 of your Colecovision, but don't plug any adapter into it yet. (wait) 3) Connect all the above adapters/PS1 Multitap together but leave the Seagull78 adapter unconnected to the 9 pin extension cable that's plugged into port one of the console. 4) Plug your Playstation controller into port A of the multitap 5) Plug the Speedlink Redeemer into port B of the multitap 6) Connect a powered USB hub (with power supply plugged into the wall) to the lower USB connector of the Speedlink. 7) Turn on your Colecovision and use the keypad of the port 2 Colecovision controller to make your game selection and start up the game. 8 ) Now plug in the adapters to the extension cable that's plugged into port 1 of your Colecovision and play your game with the connected Playstation controller. This method works for many, but not all Colecovision games. The ones that are incompatible with this method are the ones which don't allow a keypad controller that's plugged into port 2 of the console to start up the game, but only a keypad that's plugged into port 1 of the console. If you want to know how to get around that with a 9 pin splitter cable method, take a look at the video presentation. The nice thing about using Playstation controllers is that both buttons- not just one button- will work in the games that have the 2 button access. Another really nice aspect is that you can use a flightstick to play games like Zaxxon and River Raid. Also, it's nice to be able to use an arcade stick to play games like Q-bert or Ladybug.
- 3 replies
-
- 3
-
-
- joystick
- Playstation
- (and 4 more)
-
 I checked the Nintendo store and the OEM high capacity battery is sold out. They probably won't bother to make more. Prices have already spiked on ebay into the hundreds. Do we have the next Gamecube component cable here? Luckily there are a few 3rd party options on Amazon, one as high as 3600 Mha, but being 3rd party who knows what the durability is on those..
 -
So several years ago my girlfriend (at the time, now wife, lol) knocked my Wii U gamepad off our coffee table where it flipped onto the floor landing firmly on the left joystick. From then on, instead of clicking in as it should (used in a number of games) it is squishy and doesn't do anything. Luckily the directional aspect still works. Several years ago I contacted Nintendo and they said it would be $80 to fix the damn thing, no matter what. Whether it was run over by a bulldozer or if it just had one small $5 dollar part needed (like I assume mine does.) Has anyone attempted to ever repair their gamepads for any issue. Any possibility of finding parts for this? Only a couple games really have a critical need for that left joystick click, but the more I think about it the more I realize I hang onto Nintendo consoles for decades so i'd really like it working for the years ahead and maybe should just suck it up and pay the "nintendo" tax before I can't get it repaired at all anymore... Thoughts?
-
 OK, Here's my first try at adding images to a post, so hopefully it works. The first photo shows the "Prototype" coupler I built for playing Robotron using 2 2600 joysticks. It's made of layered plywood, 25x5x2 inches with 12 inches between the joysticks and weighs around 2 pounds. The joysticks are removable. They have 2x2 inch velcro squares under each of them and the joysticks fit securely in the holes even without the velcro. It has 2 holes in the front edge to allow the cords to come through along with a nylon carrying handle in the front and 4 non-slip feet on the bottom. I added a chrome strip between the two joysticks, just to break up the all black look and to better fit with the 7800 console. My score on Robotron tripled the first time I used this thing! The next photo shows a couple of custom controls I did for the 7800. The gamepad is a modded NES controller, with a small ball-top joystick added to the directional pad, and the start and select buttons removed. I also did a quick and dirty paint job, along with a new overlay and Atari logo, just as a test mostly. My masking tape failed around the logo, so the edges there look really bad. It was the first one I made before I started selling them, so I still like it. The 7800 proline in the photo has a shortened throw, by cutting down the joystick and the original knob and adding a rubber buffer to keep the joystick from being forced too far in any direction. I'll add more photos as I finish the other projects I have in the works.
 -
I have been using WinArcadia for a while now, primarily as a game development tool. I bought a Logitech F310 Gamepad to try playing some older games with it, but I am completely stumped about how to get the controls working properly. I have looked at all the settings on WinArcadia that I can find but nothing there seems to help. Some functions seem to work. The left joystick will move things around but pressing it down seems to reset the game which is beyond annoying. The Windows hardware settings don't seem to be much help either. I'm new to all these levels of complexity, and I'm probably overlooking something obvious, so any help would be appreciated.
-
Just put up my new article on the transition from joysticks to gamepads and what caused people to prefer the gamepads. My viewpoint is that gamers were looking for improvement in their hand comfort and the NES gamepad felt better than holding a joystick. Agree? http://www.nerdko.com/2016/10/29/from-joystick-to-gamepad-the-untold-story-of-what-nintendo-did-for-video-game-controllers/
-
Hi, I recently installed Colleen on my JXD78000b tablet. The Emulator runs quite nice, but I can't figure out how to properly assign hardware controls. The JXD has a lot of physical buttons and a gamepad and analog sticks. So far I was only able to assign the joystick to the gamepad and the fire button to one of the buttons (but not to the one I'd prefer). It would be fantastic if there was a way to assign also the function keys (like start/option/seelct) and some common keyboard keys to the buttons. Even better if there were game specific settings. Did anyone figure out if that's possible at all? Thanks a lot!
-
I have come to the conclusion that I don't really like the gamepad. It's just too damn bulky and annoying. There isn't really a game that I wouldn't rather play with a pro controller. I'm one of the biggest Wii U fans out there, I got mine on launch day, and have bought several for friends and family since. I think there are some cool uses for it sometimes, like touching the platforms to extend them in Super Mario Bros 3D world, or blowing on the mic in the same game (could have been done on a pro controller.) Also, a house guest knocked my gamepad off my coffee table and now the left control stick won't depress, which really only affects certain titles like AC games and such that use every button. Nintendo wants $75 to fix it which is crazy because it's likely a $5 plastic part. So the expense/durability thing is an issue. Lastly I don't think the second screen thing on a controller is a bad idea, I just think the gamepad went about it the wrong way, I think it should have been like a pro controller with a flip up part about the size of a 3DS XL screen that you could lock into place. All in all it's been annoying to have to keep it near me to mess with it when I mostly just want to play with my pro controller. Also, not all games supporting off screen play is a pain (should be mandatory) and I wish the range was just a little bit further so I could play upstairs in bed. Oh well, how is everyone else feeling about the gamepad these days?
-

Retro-Bit Sega Genesis Clone Controller used with Atari Flashback 2
Lynxpro posted a gallery image in Member's Gallery

From the album: Hardware
I bought this Retro-bit branded Sega Genesis clone game pad from Fair Game in Sacramento CA. It's a really good controller. Obviously, it's not Atari 7800-compatible, but I bought it for my daughter so she has an easier time playing the Atari 2600 games on the Flashback 2.© Lynxpro
-
Hello all! Recently picked up a PC Engine and a copy of the excellent Street Fighter II Champion Edition for the system. Great, great game, except that the PCE gamepad's paltry 2 buttons makes playing the game with some characters really kludgy (but about on par with playing the Genesis version on a 3-button pad). I know of at least one gamepad for the system which has 6-buttons and works with SF2:CE, that being the Avenue Pad 6. So if anyone has an extra one of those they'd like to sell for a reasonable price (say, $30 shipped), I'd love to take it off your hands. I've seen a few listed on eBay from Japan for around $45 shipped and up, but I just can't bring myself to pay that much for a game that I'll really only use for one game that gets played at most a few times a year. Thanks guys! - m@
-
hi, i would like to know if anybody tried usb gamepads together with atari emulators. I want to connect 2 gamepads, one is old sidewinder dual strike and second is dualshock. I tried this on atari800win, because it supports multijoy4. is such option present also in altirra? (couldnt find multijoy there) anyway, problem is that those gamepads have 8+ buttons and only one works as joystick fire. others has F5,F6,F7 functions, which is pretty annoying, because you can easily push them during game by accident.(function keys are used in emulator, so it changes speed, pauses emulation, sets autofirem etc.) do you know some SW which can remap buttons, i.e. set all buttons to behave like button1? also stupid dualstrike gamepad has very annoying way of using axes... it has kind of joint (no joystick) and these axis are mapped as joystick controls... it would be better to map DPAD there. help appreciated Martin


