

Making Labels - Part 7

Entry posted by Guest
951 views
Part 7 - Effects
At this point, the Solar Plexus label is pretty much done. Except it's still not bathed in that red glow that I wanted. We'll get to that in a minute.
Advanced Masking
First, I want to backtrack a little bit, and cover QuickMask.
Selecting and masking areas off is one of the keys to working in Photoshop. QuickMask is an advanced method for creating masks that greatly expands what the Magic Wand is capable of.
You enter or exit QuickMask with the q key. There are also a couple of small icons near the bottom of the tool palette you can click on, but I almost never use them. Q is quicker. ![]()
QuickMask overlays your image with a red, translucent picture of your selection (this goes back to using amberlith or rubylith film in photographic compositing). The red areas are unselected, and the transparent areas show your selection. What makes this a powerful tool, is that not only do you get visual feedback as to what you've got selected, you can edit that selection by painting on it.
Here's an example.
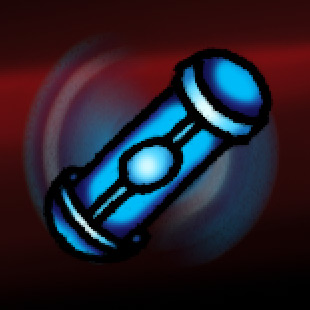
First, I'll use the Magic Wand to select the inside of the fuel pod. The dotted lines show what I've selected, but they're a little hard to see:
Line art by Jess Ragan
With the selection active, I switch to QuickMask, and now I can see exactly what is selected, and what isn't:
By using a brush, which only paints in black and white, (or more accurately - opaque and transparent), I can expand my selection simply by painting the areas I want to add with white:
Now, it may seem odd that you're painting with black and white but it's showing up as red. This is done to mimic amberlith, which was a transparent sheet of plastic that had a translucent orange (or red) film on it. You'd overlay this on top of a photograph, then carefully cut away pieces of the colored film to reveal parts of the photograph underneath (leaving the clear plastic intact). You could still see the photograph through the colored film as you were cutting it away, which is where the idea of the transparent red color comes from. The areas of the amberlith that had the colored film left on it would show up as black when re-photographed on a photostat camera. By using multiple exposures, this allowed other elements to be composited together. So that's why black is used - it's not really "black", but rather "opaque". Photoshop lets you change the color and opacity of the QuickMask to anything you want. You're not actually painting "red" - it's just a visual tool to help you create a mask.
When I switch out of QuickMask, the selection has now changed to reflect what I'd painted, and I can continue to work with it as any selection by filling it with a color, shading it, using it to create an adjustment layer, and so on:

This comes in extremely handy when you want to mask out tricky areas. You can add to or subtract from a mask with as large or small of a paintbrush as you want, or even by using the fill tool.
Effects - Filters
Most Photoshop filters should be used sparingly. Mainly because they tend to be over used, and instead of enhancing your artwork, they may detract from it. Just because a filter gives an interesting effect doesn't mean it's right for your situation.
However, you can often find uses for them that don't bring too much attention to themselves.
For the Solar Plexus label, I wanted to make the fuel pod "spin". There were lines in the original artwork to suggest this, but instead of lines, I decided to use a Radial Blur.
Whenever I apply a filter, I always make a new layer containing a copy of whatever I'm going to apply it to. This gives me the option of re-doing it later if I want to change it, without affecting the original image.
For the fuel pod, the first thing I did was create a new layer with just the color, shading and highlights on it. The reason I left off the outlines was that if I blurred those, most of the blur effect would just be black.
To create this layer, I turned on only the layers I wanted (color, shading and highlights). Then I created an empty layer called "Fuel Pod", and "stamped" a copy of the visible layers onto this new layer. In Photoshop, stamping will take all of the currently visible layers, and combine them together onto a single layer, but it will still leave the original layers intact and separate.
Once I had the new layer made, I had to get rid of everything except the fuel pod (otherwise everything would get blurred). To do this, I selected the interior sections of the pod (see "Advanced Masking" above), inverted the selection (from the menus choose Select > Inverse), and hit delete. This removed everything from the Fuel Pod layer, except the pod.
Once I had the fuel pod by itself, I made copy of that layer (which I'll explain in a minute) named "Fuel Pod Spin", and applied a Radial Blur filter to it (using the Spin option). It took a few undos and retries to get it right, but this is what I ended up with:
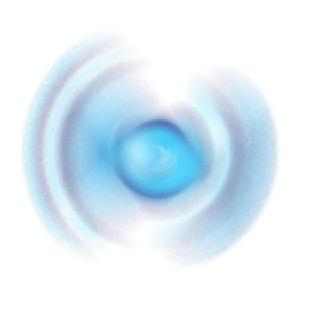
The problem is, now the blur is on top of the fuel pod. For some things, this may be what you're after, but in this case, I wanted the blur to be behind the object. That's why I blurred a copy of the Fuel Pod layer. Once the blur was done, I moved the original Fuel Pod layer on top of the blurred layer, to restore the original look of the pod. The end result (with the background layer turned on) is this:
Effects - Colorizing
In order to get that red glow that I was after, I added a Hue/Saturation adjustment layer to the document, and placed it above the layers I wanted it to affect. I checked the "Colorize" button, and adjusted the sliders so it was the hue of red I wanted.
At full strength though, the red was far too intense, and overpowered the image.
To fix this, I simply turned down the opacity of the adjustment layer until it looked right. If I'd applied Hue/Saturation directly to the other layers, I wouldn't have been able to make this adjustment. Leaving it on a separate layer allows me to change the color, intensity, or even completely turn the effect off.
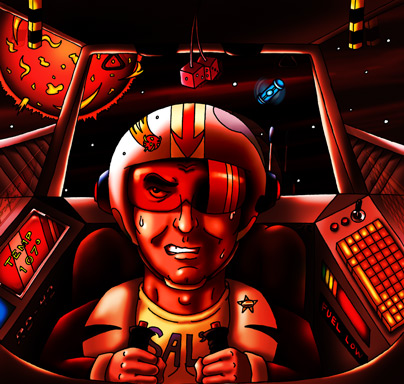
The finished artwork
So here then, is the final artwork. I sent Jess the layered version so if he wants, he can go through and easily make changes to it. Well... assuming he has Photoshop, that is. ![]()

These are the final layers of the document. I'll give you a rundown of what each one is:

-
Outlines - Final: These are the outlines of Jess' drawing. The layer is set to "Multiply" so the white areas are transparent. The mask layer (the square on the right) masks out the original lines around the fuel pod. I could have also just painted them out, but this gives me the option of bringing them back if needed.
-
Group 1: Not really a layer, but a grouping of layers containing all of the color elements. These are grouped together so I can turn them all off and on with a single click, which makes selecting areas (using the Outlines layer) much easier.
-
Pilot Contrast: Jess asked me to increase the brightness of the pilot a little, so he stood out more. I thought that was a good idea, so I selected all of the areas that made up the pilot, and created a Levels adjustment layer. This gives me (or Jess) the option of increasing or decreasing the relative brightness of the pilot as needed.
-
Fuel Pod: This is the copy of the color, shading and highlight elements of the Fuel Pod.
-
Fuel Pod Spin: This is the copy of the Fuel Pod layer with the Radial Spin filter applied to it.
-
Red Hue: This is the Hue/Saturation adjustment layer which colorizes everything below it red. I placed it below the Fuel Pod layers, so the pod remained blue.
-
Side Glass Reflections and Back Glass Reflections: Pretty much self-explanatory. They're on separate layers so I could adjust their opacity independently of each other.
-
Goggle highlights: The highlights for the goggles.

-
Goggles: The goggle lens color. This layer is set to multiply, so it darkens and colors the layers below it.
-
Side Glass: This is another Hue/Saturation adjustment layer. It's almost completely transparent - it's just there to give a hint that there's glass on the sides of the cockpit.
-
Highlights: The highlights layer for the main illustration.
-
Shading: The shading layer for the main illustration.
-
Color: Flat color for the main illustration.
-
White Background: Most of the layers have areas that are transparent - even the color layer. This makes sure that the areas that are supposed to be white that I didn't remember to paint, are actually white.
One final note - when working in Photoshop with layers, it always helps to name them as you go along. The more you get used to working with layers, the more you'll use them. But they can become confusing if you can't remember which is which. ![]()
2 Comments
Recommended Comments