
Search the Community
Showing results for tags 'Adaptor'.
Found 8 results
-
 Hey guys, I'm starting this new thread for the various adapters I make since the old thread was getting a bit long, and the original posting didn't contain the various adapters I now offer. The original thread can be found here. Here is the current lineup of adapters and extension cables I have for sale: Intellivision 1 Flashback Controller Adapters (for the original console, INTV, Radio Shack etc. variations with the "hard wired" controllers): These are $24/pair (only sold in pairs). Approximate length is 18 inches. Intellivision II / Sears Flashback Controller Adapters (for the Intellivision II and Sears consoles with the removable db9 connector controllers): These are $14 each, or two for $26. If desired, you can specify the color of the decorative heat shrink tubing near the cable ends. Black is also an option. If not specified, you will receive whatever color I have in stock at the time. Approximate length is 6 feet. Standard db9 controller extension cables - 6 foot length (for Intellivision II / Sears consoles, Atari 2600 / 7800, Sega Genesis, Atari and Commodore computers; basically anything that uses a standard db9 type connector): These are $7.00 each. Colecovision Y-Adapter cable - allows connection of standard Colecovision system controller and an additional compatible joystick (Atari 2600, etc) without the need to unplug / swap controllers one at a time. Should work fine on other consoles that use db9 connectors - but only tested on a Colecovision): These are $12 each. If desired, you can specify the color of the heat shrink tubing, including black. If not specified, you will receive whatever color I have in stock at the time. Approximate length is 24 inches. ----------------------------------------------- Please send me a PM here on Atari Age if you are interested in any of these cables. Include your shipping / address information, and preferably an email address, and I will get back to you with a total. Payment is via PayPal. Credit cards (processed through my business - White Flag Computing) are also an option if you don't use PayPal. You can also email adapters@intellivisionaries.com instead of sending a PM if you prefer. Shipping is not included in the above prices. USA orders will be shipped via USPS Priority Mail (usually flat rate small box, which is $6.80 - the price went up January 2016, it used to be $5.95). I can also ship USA orders via First Class Mail in a padded mailer for a little bit less. International orders will be shipped via USPS International First Class (padded mailer - price varies depending on weight and destination). Thanks!
- 87 replies
-
- 3
-

-
- Intellivision
- Flashback
- (and 5 more)
-
 Is anyone selling these still? I'd eventually like to move away from disc based media, as it's unreliable and fragile as hell. I seen these in the past for 3DO, Saturn, and PS1, but not much on them lately. Any news on the USB adaptor that replaces the 3DO laser and you can load rom images from? Thanks.
 -
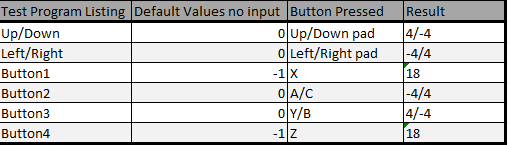
This is a 6 button 8 directional gamepad for the TI-99/4a natively. (No Adaptors needed) It's meant to be a D.I.Y. project. Total cost to me was Aprox. $19.00 US for 2 gamepads and 20 diodes. Controller Source - https://www.amazon.com/gp/product/B00EAM862S/ref=oh_aui_detailpage_o02_s00?ie=UTF8&psc=1 Diode source - https://www.amazon.com/gp/product/B005T6Q3RE/ref=oh_aui_detailpage_o01_s00?ie=UTF8&psc=1 I don't know who created the original schematic, I find it all over the web. But the original in the upper left of my picture below is of a 2 port atari adaptor for the TI-99/4a created by someone else. Same goes for the pin out diagram for the TI side including the 2 db9 pictures. Add to that other materials used (solder, wiring, glue) for pennies PLUS time and you have yourself 2 TI-99/4a Gamepads, one for each console. If I were asked to build one for someone, I'd ask for $20 $40 per joypad completely modded as shown. I had to up the price because it takes me a couple of hours to complete a mod on one Joypad including setup and breakdown times. I highly encourage you all to do this MOD yourself but if you really want me to do it for you, I have to ask for more money due to time. Looking at the attached picture will show you how I did this with the materials I had. I'll give some notes here: 1. Plan ahead with your own drawings that you understand. Your wire colors may differ depending on the controller you go with. Test them all and make your own chart for pin#, colour, board location.You'll want a controller that has all 9 wires to be certain. Sega Genesis controllers are like that as far as I know. 2. Test every wire and connection from the cable end to the connection ends as you go along. Check all solder points and pad connectivity as you go. One at a time. 3. It's easiest to do the Joy1 and Joy 2 connections first since they do not have diodes associated with them. 4. Be sure to isolate all traces. I used a dremel to obliterate the logic chip in to dust and cut all the lines. I isolated each solder point the gamepad already had and made sure joy1 and joy2 check lines were isolated from each other. review the photo and follow the traces. It should all make perfect sense. 5. I used Hot Glue to hold things in place and I applied it as I went along ensuring I isolated all possible shorts (using hot glue as an insulator). 6. I also drilled holes next to all the already connected wires on the board to allow me an easy path for my connections. You can see the unused holes in the picture for lines 1->7 and 6->5. 7. I was fortunate that the gamepad board had exposed round pads of bare solder. I suppose those were for Q/A testing. I drilled holes next to the ones I needed for new connections. I had to scratch the enamel off the common trace for J1 Signal sitting in the middle of the 4 directionals due to lack of circle solder pad. You can see the circle pads I soldered to, there are a few unused. Look at the ones near the middle buttons that went unused in the picture below.... 8. Be careful not to short any bare wires, be aware not to close holes that were there already (for encasement pins) and of course be aware of your drilled holes when applying hot glue if you choose to mimic my method. 9. I borrowed a program from another Topic thread to test. There was a typo in the original, find it and fix it. - Source = http://atariage.com/forums/topic/166557-proplay-new-4-button-gamepad-for-ti/?p=2058171 Already fixed and slightly customized code. Note: I think it's inefficient for game controller code but works for testing. My Test Results. 10. Use it as intended. - You can certainly use this gamepad as a single player Joy1 for any existing games you have. OR play two player games on one gamepad.(WHuh?Why? I know) However; the joy 2 buttons are just that, for Joy 2. So if you press them in conjunctions with Joy1 buttons in a game such as PARSEC (pressing up on both Joy1 and 2 at the same time) it will allegedly cause glitches or something undesirable (no damage just in game controller glitch). Don't blame the joypad. If you connect two TI joysticks and did the same thing, you'll probably get the same glitches. It doesn't make sense to use the controller in this way for existing games that aren't coded for this. 11. Further modifications were necessary. The bottom half of the controller housing has cylinders molded in to fit flush against the PCB. I needed to give 'em a little shave with the dremel to fit the wiring and hot glue. 12. Don't hold me responsible if you destroy the planet by attempting or using this modification. Or even if you break your console or something less destructive than destroying the entire planet. I knew the risks and now you do too, If you follow these instructions, any part of them, in real life you do so at your own peril. Just because it worked for me....doesn't mean it'll work for you in the sense that it could have been my fault. Last but not least. You will need games specifically coded to work with the full functionality of this controller. The game pad directionals and the X button are the Joystick 1 directionals and fire button. Y/B/A/C/Z buttons are for Joystick2 as follows in same order Up/Down/Left/Right/Fire. I attempted to make my connections standard. So anyone who wants to make their own 6 button gamepad for the TI to code for, please take in to account the button assignments. Together we can establish a new standard in TI gaming and ensure our programs work across the board with any controllers folks my make on their own utilizing this Topic Thread,. THE START BUTTON IS UNUSED AND DOES NOTHING. Of course, I rate this project as easy for an ametuer. But do ask and learn, I used a heat sink for every solder point to protect the diodes. I don't know it that's unnecessary, but I did it anyway. Thanks to everyone here for encouragement and help. Now it's time to start making games that can take advantage of this design and layout. Get creative. Street Fighter? Tanks game where you can move one way and rotate the turret another? Puzzle games where you have to control 2 characters to solve the puzzle ? (Castle of Dr. Creep anyone? - (C64 game) or The Goonies?) RPGs with spell, attack, defend, jump, dodge buttons? What would you like to play on your TI with a 6 button gamepad? Make it, Code it, Play it. Share it. Do it.


-
Ok so i have been working on a variation to this thread http://atariage.com/forums/topic/231131-flashback-to-colecovision-controller/?hl=%2Bflashback&do=findComment&comment=3805492 i have gone through and fixed the issues with the code pasted in the above link and rewritten it to allow a jaguar joypad to be used the current working prototype runs using every usabe IOpi on an atmga328p-pu microcontroller using its internal 8hz clock before i would decide where i should go from here i would like some feedback i cant add any more functionality using this processor becuase it is being fully used, so say if i wanted to add 2 players it would mean using another processor of the same settup to control joypad 2 an option would be to use at atmega 2560 which has many more pins that could be used. unfortunately this is a surface mount chip so it i a bit of a pain to make your own boards with it attached especially for prototypes i have hopfully attached a poll to this for everyone to provide some feedback before i decide what to do next
-
Colecovision: AC adaptor X2 Controllers X4 (working condition or not) CIB Games Intellivision: Intellivision 3 shell or replacement metallic stickers Intellivision 3 controllers (working condition or not) replacement Transformer CIB games I have paypal or willing to trade other consoles or parts
-
I have decided, to reduce the number of adaptors I need, to buy an NTSC tv for NTSC consoles. I have a question though, would I need to buy a transformer? What is the difference between US and UK voltage? Thank you for any help.
-
 Just wondering, those famiclone controllers come in many sizes, shapes and configurations. A few of them are very comfortable as they mimic a Playstation controller. Would there be any way to convert their Sega Genesis style plugs to use them in a real NES or Famicom console?
 -
Hi all, I was given a 7800 a few years ago minus it's power adaptor. I recently did an experiment to allow it to work with another adaptor of the same rating, but modding the connection. I've made a video on my YouTube channel showing how I did it. Please leave any constructive comments ) Video: Best regards Steve


