
Search the Community
Showing results for tags 'atari'.
-
 Hello again, I always wanted to learn assembly for graphics but sadly have had no time and have been laid off. Looking for $100 + shipping from Los Angeles. Would also consider AtariAge voice enhanced Berzerk cart + some cash.

-
Creating the Retro Gaming Experience To me, sitting infront of a flat screen TV using some emulator and a wireless controller didn't really provide me with the best Retro Gaming experience. When I first tried playing the old games I used to love on emulation, it just felt empty and stale. I wasn't sure why at first, then it hit me. When I was playing the games, I was looking for that nostalgic experience. I wanted to relive the memories of my youth. Unfortunately emulation wasn't sparking that nostalgic memory. I needed a true Retro Gaming experience. I learned then, there was a difference between just playing a retro game at home and actually "experiencing" home retro gaming. I kinda compare it to the experience of playing one of the new Arcade One-Up machines in your house compared to actually going to a real (retro) arcade. Both experiences are extremely different even though you're playing the same game. So it's the atmosphere that plays a big part in contributing to the experience. (I needed to bring the atomsphere back) So a few years ago I decided to create my own Home Retro Gaming experience by creating a retro gaming nook. I had a small space in the corner of my garage to use as a template. This would take a lot of patience and hunting. Though I had plenty of Atari stuff in my collection, I still needed to hunt out the decor I needed for this retro nook. To sit down somewhere and feel like I went back in time. The act of playing on a old CRT TV, being restricted by cords. The earthy tones of the wood paneling. The simplistic decor of the late 70s/early 80s of my youth. To design something that took me back in time would offer the true experience. My first pick-up was this 1977 Sony Trinitron with matching TV Cart: So during the next year-and-a-half I combed eBay, Facebook Marketplace, Craigslist, and local thrift stores. I not only needed the right decor, but I needed it cheap (I didn't really have much of a budget). Once I accumulated enough stuff to make my design reality, it was time to begin. I decided to dedicate a small corner of my garage for a retro corner. I started with the wood paneling. Luckily, many of the home improvement stores still carries wood paneling for very cheap. After getting the wood paneling up, it was only a matter of laying the carpet down and putting the pieces in the place. When all was said and done I only spent around $300 to complete this project. A lot of the cost savings came with patience. waiting to find the right stuff for the right price without overspending (For example, the TV and cart I was able to pick up for $30). Here was the end result. The final Retro Nook came out better than I imagined. Sitting in this corner playing my Atari, I almost thought I was back in 1983. Even the copper colored wing-back chair was the same chair we had a 1983 (my family never had the heart to get rid of it). People have to remember...... Back in the early 80s, most home decor were still from the 70s (unless they recently remodeled). Add a little stale tobacco smoke to the nook to complete the Retro Gaming experience?. For the rest of the year I often enjoyed disappearing in my little gaming area to relive some of my nostalgic memories. At times my kids even joined me. It was great to show my children how "dad" played games when he was a little boy. During the next summer I decided to do a redesign of my retro corner. I wanted to make it a themed corner, as well as incorporate one of the old cabinet TVs that I have. I have always been a fan of playing original hardware on original hardware. So I have multiple CRT TVs that my children and myself use. I do have a few cabinet TVs and I had one in particular I wanted to use for my new "themed" retro corner. Here is a old cabinet TV I have in my bedroom. It's the TV I used most of the time before I designed my retro corner. Anyways, since I wanted to redesign my retro corner I decided to do it themed design. I decided to go with a Q*Bert theme which was one of my favorite Retro Gaming characters. It took a while to gather all the stuff I needed for the redesign. I already had an old 1970 zenith cabinet TV I wanted to use, but to find the right Q*Bert themed decor was a little challenging (more specifically the wall art). Then I found the perfect piece. A Q*Bert latch hook rug became available and I just had to have it. I was also able to acquire a orange wingback chair for $20. Here is the final design...... This Q*Bert themed design I was extremely happy with. I decided to get rid of the table to bring back the good ole days of having to sit on the floor to play. Coincidentally enough, I finished this design right around Halloween. I actually had a old early 80s Q*Bert costume (one of those old vinyl Collegeville costumes). My son decided to humor me and put the costume on so I could do a Halloween photo. I tried to use an aging filter to make the photo look a little less "high def". I'm not professional photographer so I did what I could with my cell phone, lol Here was the end result. MY 2020 DESIGN..... In 2020 I decided to shrink up the design a little. To make something simpler, and to design a area that would mimic a image you would see on a Atari Ad. I used a different TV for this one (1984 Zenith). One of the best parts about having this retro corner is being able to spend time with my kids introducing them too the early gaming experience. Due to Covid-19 and spending a lot of time at home, we were able to spend a lot of time playing games together. All in all, creating a authentic Retro Gaming experience is relatively inexpensive and you only need a very small space. Playing these games takes me back to a simpler time. For some reason I find it more enjoyable playing on my retro setups then I do behind a computer screen or on some other type of emulation. The feel of the carpet, the act of inserting the cartridge, the smell of the TV tubes, the sight of the wood paneling, and being restricted to the limitations of technology all help contribute to the overall Retro Gaming experience. This is what I remember, and I find myself actually enjoying playing these old games more as I disappear in my time machine. COVID-19 The summer of 2020 I came across a old 1979 Sony Trinitron. I decided to do a very quick redesign to include that TV, as well as using my Space Invaders wall art I've been holding onto for a while. After I was done my children's school went to "virtual learning" due to the Coronavirus. My kids decided to turn my Retro Nook into a Virtual Learning Battle Station, (where old technology mixes with new technology..?). My 2021 design In 2021 I wanted to mess around with more themes within my design. I decided to start spring off right and go with a Easter theme. About 2 weeks before Easter, we got word that the Easter Bunny was going to visit our house on Easter morning. I wanted the Easter Bunny to feel welcome and it was a perfect opportunity to use my retro corner for my children to take photos with Easter Bunny. So I quickly put my Retro Corner together preparing for a special visitor. After the visit from the Easter Bunny I want to create a ? Alien ? themed area. This is something I wanted to do for quite some time. I've always been a fan of sci-fi and I wanted this "Alien Abduction" type of feel for my 2021 design. Green accent lights to give the whole corner a eerie glow This alien design for a 2021 is really fun to work with and I'm constantly changing it a little. I recently got rid of the green lights and decided to give it more traditional lighting. The kids and I have a great time playing games in this area and I love the fact that my children enjoy having a little retro gaming time with their dad. Ghostbusters Afterlife 2021 In October of 2021 I decided to change up the decorations in the room one last time in anticipation for the new Ghostbusters movie. Myself being a child of the '80s I have always loved the Ghostbusters franchise so I decided to give my retro Corner a Ghostbusters theme for the final design of 2021 2023 DESIGN This Retro Gaming corner is just a temporary setup in my garage. I pack everything away for the winter time and then in the spring I set it up again. One of the best parts of doing this, is that it gives me the opportunity to constantly change the design. And in 2023 I wanted to utilize this 1976 Zenith TV. I wanted to keep it a little simple this time around. This TV was another free pick-up from someone who didn't want it anymore. I spent another year finding the right TV cart, Zenith rabbit ears, and 1976 Zenith radio. I absolutely loved how this TV set up turned out. Here it is set up in my Retro Corner It's been a blast having this little retro gaming corner. In the past 4 years I have been able to spend a lot of time in my retro corner playing my old Atari with my kids (and creating awesome memories). Hopefully someday I will be able to dedicate a entire room to the simplicity days before the internet. The days before the constant bombardment of social digital stress. Thanks for reading my blog.
- 9 comments
-
- 14
-

-
I made the video about a year and a half ago in honor of Atari's 50th birthday. I'll admit, it may not be 100% accurate, and it may be short, but feel free to tell me what you think.
-
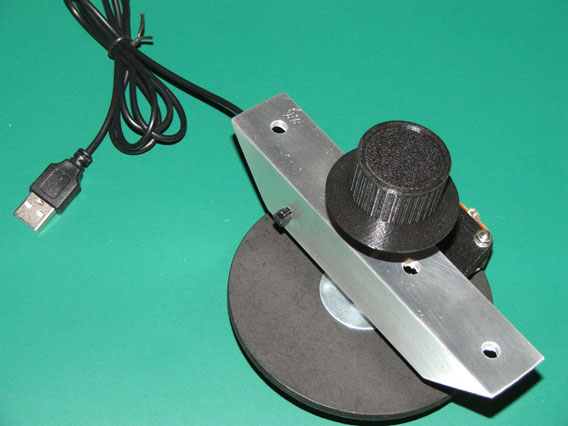
I’m currently working on a personal MAME arcade project and a couple of the games I’m thinking of using would need a spinner control. I know I could just buy a USB spinner control but, I thought I would come up with something for my own use that was a little cheaper to build yet still felt like a Tempest arcade spinner. This is my beta test unit and I still have a couple of minor changes that I want to make to it. I designed the knob to mimic a standard Atari spinner knob. Since I’m 3D printing the knob I had to design it in such a way as to be more friendly with my 3D printer. The other 3D printed part is the USB PCB bracket. This spinner control is basically a modified USB mouse mounted over a mechanical spinning disk. Since it is a standard mouse PCB the computer sees it as just that, a mouse. To keep with an authentic feel I made the mounting the same as a standard Atari arcade spinner control. I sized the disk to match the mass feel of an arcade spinner control as well. I've seen other DIY USB spinners on the web, but they never seemed all that robust and I’ve never seen anyone try to match the actual weight of an arcade spinner. So, this is what I’ve got. Let me know what you guys think.


- 81 replies
-
- 6
-
-
- arcade spinner
- Atari Tempest
- (and 4 more)
-
 20 years ago I decided to get my feet wet learning how to make games for the Atari 2600. I had sincere intentions but back in 2004 I was simultaneously just starting my first ever gig writing humor columns for an online outlet. I was torn between two loves and because my foundation as a creator was grounded in performing comedy I took the route of following the path of a writer, though I always wondered what was down the road less traveled. Now I am back to hopefully relearn everything and then some and bring some of those old video game ideas to life and it all can be traced back to this game. Pineapple 2000 was my first "finished" Atari 2600 project and I had big aspirations for it. I wanted to get a miniature comic book made for it that told the story of the lone gingerbread man fighting off the invading swarm of "Fruitoids". Real stupid stuff and definitely something that matched the spirit of "lol so random" humor that permeated the early 2000's. Ultimately none of this came to fruition and I wound up getting about 20 cartridges made to sell to people on AtariAge who were interested in collecting oddities for the system. I did not sell all of the cartridges and a few of them (like 3 or 4) are buried in my garage somewhere. (If I ever locate them I plan on selling them at a slight premium due to their rarity in order to fund future game design endeavors.) This game is based upon the code of Space Invaders. In fact there is very little separating it from the base game as this is predominately a graphical hack. I wasn't sure how else to really improve upon Space Invaders beyond that. It's not an impressive hack in the slightest but it's important to me from a historical standpoint. Maybe you too will find something to smile about when you play it. I've attached the BIN of the game to this post for you to download. Additionally the game is available through itch.io and archive.org. If you are interested in reading about the fate of the "Radio F Software" label that produced this hack I wrote up a blog post about it here. Thanks for checking out my post. Keep your eyes glued to this section of the forum as my first proper game in 20 years is nearing completion! pineapple_2000_v1.bin
-
Hi - I’d like to sell the whole lot to one buyer maybe $3 per cart. Local to NC or SC would be great but I’m fine shipping in the U.S. lower 48. Please PM me if any reasonable offers. All carts were tested (on a 7800) and working as of a year ago. Thanks!!

-
 Hi - For you budding label variant collectors. I am selling the more rare label variant that is singular “STAR RAIDER” (on the right) rather than the more common plural “STAR RAIDERS” (on the left). I have two of these more rare label variants to sell. Please PM me if interested. Asking $19 plus shipping for one. I have many other cartridges for sale too. Buy in bulk to save on shipping 😁
-
Hello, I have scoured the web and even SoulSeek for these...I tried to buy on eBay but the seller is not responding (I guess he was in the hospital?). For whatever reason, I cannot find free labels ANYWHERE online...Would anyone be so gracious as to send me print quality PNGs or JPEGs of the HERO and BEAMRIDER labels for activision 2600 carts? I would really appreciate it. Would be nice to have them spec to size to be ready to print. If not, could someone kindly give me the correct print dimensions for these labels as well? truly grateful, thanks! Frank
-
I just saw this local CBS San Diego news feature on Atari come up on my YouTube feed. Not sure if a lot of others have already seen it, but I thought it was pretty cool so wanted to post with a link here at AA 😀
-
 Full story at the link: tinyBuild Inc (LSE:TBLD), the indie video game developer behind the popular ‘Hello Neighbor’ games, has warned investors it may fall into bankruptcy – if a funding and stake sale to Atari is not ratified by shareholders https://www.proactiveinvestors.com/companies/news/1038209/hello-neighbor-developer-tinybuild-urges-shareholders-to-back-funding-and-atari-investment-1038209.html#
 -
Hello, I apologize if this is the incorrect place to ask questions of this nature, but it was the forum I thought was best for posting my question. I bought an Atari Classic Wireless Joystick to play various titles including Atari titles on my PC. The webpage from Atari for the joystick states that it can be used with a PC. Anyway, when I plugged in the joystick to charge, my PC recognized it. Post charging, the instructions say to press the button with the Atari logo quickly in order to start the pairing process. It also says the logo will appear lighted and blink for a short time period while you pair the joystick. Unfortunately, my PC is not showing the joystick as a device I can connect while the light is blinking; so I have no way to pair the wireless classic joystick with my PC. I'm assuming I must be doing something wrong, as the joystick is recognized when I plug it in to the PC to charge via USB. All my other wireless devices show up, so I'm not sure what the problem could be other than something I'm doing myself incorrectly. Does anyone know and can list for me the specific steps for what I must do in order to get the wireless classic joystick to show up on my PC to pair it? Is there some extra driver I'm supposed to download or something? (I've looked, but can't seem to find anything like that) Thanks in advance.
-
Hi all I have recently finished my Atari Flashback Raspberry Pi conversion. I have based it on the look of the Atari 2600 Vader edition. This is an Atari Flashback 6 with a Raspberry Pi 3b+ inside with Retropie. I removed the Flashback buttons and replaced them with arcade style buttons. I used black snakeskin style vinyl wrap to cover the brown wood effect front panel. I removed the old Joystick ports and added USB ports. I cut a hole in the back to add an HDMI port. Another hole was cut to add a Micro SD card reader so I can easily remove the SD card without opening up the whole case. I wired the Pi board to the power button and a white power LED. Hot glue, super glue and lots of filing was used for the project. The Pi board is currently sitting loose in the case as not a lot of room to bolt it in, but it is very secure as it is. I have converted an Atari Flashback 7800 joystick to work via USB by using a convertor. Also connected, an 8Bitdo wireless controller. Just for effect......I messed around with a couple of "free" retro wallpaper backgrounds and stuck my Flashback in the middle, which came out well.
.thumb.JPG.c4707cc8d9940530a62ae7921a2e90f7.JPG)
.thumb.JPG.553de504889d22172528e0158a9295f9.JPG)
.thumb.JPG.1553e2e56ac67e13c2101a544375c218.JPG)


- 15 replies
-
- 11
-
-
- atari
- raspberry pi
- (and 5 more)
-
Before I begin, this will focus on original titles, and not arcade ports. -Zenithian Khei (Mega Man X meets Super Turrican 2) -Ginnan (Actraiser with an Old English/Anglo-Saxon twist. Part of the Middanyeard series.) -At least three shmups/space shooters. -At least two more Middanyeard games. -At least two titles in the Demon Lands series. -One Isometric game.
-
Atari announced it on Twitter, and on their website. Here's the link to the web-site. https://atari.com/products/haunted-house-1


-
I’ve got a junior that turns on fine. You see the game, but it’s as if the signal is not fully lined up with the channel selected. I’ve tried different channels, gave it a cleaning, twisted the red thingie to see if that would help, asked politely but nothing’s made a difference. I also tried to find what’s always referred to as the chiclet looking film capacitor on earlier models but not having luck. Any experts know if there’s a specific that seems like an obvious fix?

-
SOLD Hi - box only for sale. Please make an offer + shipping cost. Box is in fair condition, see pictures. Has some handwriting on top. Can collapse it and ship flat (sandwiched with other cardboard) or box it inside another box.


-
-
This is the final entry in the SwordQuest 'Jr' series. WaterWorld is pretty much the easiest game of the three anyway, so making it 'Jr' wasn't nearly as hard as the other two. One significant tweak here, I didn't like how the game 'reset' after each clue, so I disabled that feature. Unfortunately, there is a considerable pause after the clue before you can start playing again. But other than that it seems to work fine. Another tweak was getting rid of all of the in-game hints. They just seemed annoying without any real benefit. Each room needs at least 4 items to get a clue. The clue will help with the next room, as long as you work from the top room to bottom room in that order. The final clue will actually help in AirWorld, if you are able to get a copy of that game. Although there is no official PAL version of WaterWorld, a conversion was made by Omegamatrix (among many other PAL conversions), so I hacked that one to match the NTSC version. Hopefully it works as intended. Swordquest Waterworld Jr.bin Swordquest Waterworld Jr (PAL).bin I actually have some more ideas for the three SwordQuest games, but they must wait until I get much better at understanding and manipulating 2600 code. Until then, thank you all!


-
- 2
-
-

-
- atari
- swordquest
- (and 2 more)
-
-min.thumb.png.3e03ea0b67a7bbd38735b3279663741f.png)
atari2600 Atari 2600 (woody) won't work! Riot Chip gets hot!
DatsunDeer posted a topic in Atari 2600
I bought an Atari 2600 from a yard sale with a buncha games for about 20 bucks. When I hooked it up to my TV, the screen was all black except for red and blue vertical lines on either side of the screen. If I kept restarting the console I could sometimes get vertical bars with several different colors and a humming noise. I replaced the RIOT chip with one I ordered from eBay that claimed to be working hoping that would fix it but i got the same results. The RIOT chip will heat up the longer the console is on and eventually get so hot it's uncomfortable to touch. Any ideas on what to do? -
Mark your calendars!!! Anyone within driving distance to Charlotte, NC I am hosting the first annual good old fashioned Atari BUY/SELL/SWAP/TRADE event!!! Save the eBay fees and shipping headaches. This is my first time organizing an event like this so I'm sure there will be some rough edges. If we have good attendance I would like to make this a yearly event. This first time we will go 90% Atari. If we can't fill the room with Atari then at future events we may include some of the other classic 8Bits. I have a ton of Atari 8bit and Atari ST items that I clean, repair, fully test and sell to pay for my hobby. I will be bringing at least the following items for Sell/Trade: Fully tested/working: 8bit - 400, 800, 600XL, 800XL, XEGS, 1050 drives, IndusGT drives, lots of Atari books, 60+ unique cartridge titles, some software on 5.25" diskette, joysticks, paddle controllers, trak-ball controllers Fully tested/working: 16bit - 520ST, 1040ST, both color and monochrome Atari monitors, mouse, books, some software on 3.5" diskette, 100+ Atari 2600 game cartridges Items that need TLC and/or repairs: Atari ST 3.5" external diskette drives, 410 and 1010 recorders, 1050 drives, IndusGT drives, monitors, joysticks, good outer shells for most A8 and ST units, many parts. If you have an A8 and need a minor repair or an upgrade/mod, PM me and I will let you know if it is something I can do for you (not during the event). I'm sure I am forgetting many items 😁 For show and tell I will have several playable Atari 8bits so the kids and kids at heart can play ATARI !!! I will also have a 4MB Atari STE my recently acquired Atari TT030 up and running. There are already commitments from others who are bringing their Atari items for Sell/Trade. I plan to create an Event on Facebook and will add the link here. I will need 2 or 3 volunteers to help me with setup and take-down (lite clean-up and we must put the tables and chairs back the way we find them, etc.) Expect to pay with Cash or PayPal only. Other sellers may offer more options but those two are it for me 😁 When: Saturday August 5th, 2023 Hours: 10am to 2pm Fees: CASH ONLY $5 admission per individual or family OR $10 per table (with 1 or 2 chairs) if you are bringing items to sell. You must contact me by PM if you wish to have a $10 table as the number of tables is limited. Snacks: CASH ONLY A limited number of sodas, water and packaged snacks will be available for purchase as a nominal fee Location: James B. Crump VFW Post 2423 100 VFW Ln, Indian Trail, NC 28079 Note: the VFW post is in the process of changing the name of their road so you may also see the address as: 100 James Crump Way, Indian Trail, NC 28079 This location is 16 miles from the center of downtown Charlotte and is only 4 miles from the intersect of I-485 and East Independence Blvd (aka Highway 74) Here are pictures of the event space. One showing their recent renovations and one showing the tables and chairs. I believe they are 5 foot tables. Example of the tables/chairs for the sellers. Note: the location of the VFW Hall. It is right next to the Railroad tracks. Lots of parking is available right outside the building.


-
 I haven't found anything yet, so maybe asking here will yield better results... but I'm wondering if there is any point-of-sale software available for the Atari 8-bit? Off-topic: What about for the Atari ST line? Thank you, in advance! Tim
 -
Hello guys!! I thought I'd make the official Atari 2600 4 switch woody serial number thread. There is a serial number thread for the Heavy Sixer, Light Sixer, Vader, and Junior models. After extensive searching, there is none for the CX-2600A 4 switch woodies manufactuted from 1980-1982. Share your 4 switch woody consoles and their serial numbers. I'll lead off with mine. And the one out of my 5 different 2600's that get the most play time. My official game room system. The 4 switch woody 2600 and Sears Tele-Games serial number list as of 8/30/15 #81019322 Sramirez2008 Atari 2600 NTSC Taiwan #81134671 spawnshop Atari 2600 NTSC Taiwan #81205352 hookem Atari 2600 NTSC Taiwan #81914252 Sramirez2008 Atari 2600 NTSC Taiwan #82281004 zylon Sears Tele-Games NTSC Taiwan #82506814 BurritoBeans Atari 2600 NTSC Taiwan #549274883 High Voltage Atari 2600 PAL Hong Kong #827821160 SonicSageGamer Atari 2600 NTSC Taiwan #828289936 Retrogamer81081 Atari 2600 NTSC Taiwan #828368579 opry99er Atari 2600 NTSC Taiwan Manufactured in Taiwan S.N. 828289936


- 43 replies
-
- 4
-
-
- 4 switch woody
- serial
- (and 3 more)
-
Here's the trailer for Mr. Run & Jump, the new platformer from Atari and developers Heavy Horse games. Coming to all platforms, including the VCS in July.
-
Hey I was watching Ben Hecks portable single chip Atari video. He showed a brief image of the bottom vents with a couple sentences on how to spot it. I got curious and started looking at my Jr. It kinda looks like his image... Im not sure it wasn't great instructions. I was going to open it but its never been opened before and I don't want to pierce the serial number label. Anyone got a sure way to spot one without opening it. Perhaps certain serial numbers, or physical differences in the casing or labels. Let me know if any of you have knowledge of this.
-
For Sale - I have likely 3 sets of spare Atari 800 key caps for sale. Individual keys $5/each plus actual shipping. See pictures for examples. [Update] I now have a few space bars too. All key caps are for the 800 only. NOT for the 800XL I have many cartridges for sale too if you need any we will just combine shipping with key caps. Thanks!!


.JPG.859929e734b4833b6f8f881111206d0d.JPG)
.JPG.6dcd24f79445648a59832267c298f8f8.JPG)
.JPG.d2f1cf78f3f7c40d8f26e0ec4cbc7706.JPG)


-min.thumb.png.3e03ea0b67a7bbd38735b3279663741f.png)


