
Search the Community
Showing results for tags '6 Button'.
Found 5 results
-
 Hey there guys and gals! This afternoon I got a couple of Retro-Bit's new 6 Button Sega Genesis controllers in the mail from Amazon, and since a lot of folks around here have been curious about them I thought I'd take a few minutes to do a little review of these controllers and compare them to Sega's own 6 button controller from back in the day. First off let's take a look at the packaging. Retro-Bit did a really nice job on the box, which as far as I can tell looks almost identical to the boxes that Sega shipped their 6 button controllers in back in the 90's. The plastic insert inside the box that holds the controller in place is rather flimsy feeling, but the controller it holds is most certainly not. To cut straight to the chase, let's take a look at Retro-Bit's offering next to an original 6 button Genesis controller from 1994 that I purchased brand new on eBay a couple months ago and have only put a few hours of use on since then. From the outside it's clear that Retro-Bit's partnership with Sega on this project was a fruitful one. The color, feel, fit and finish of the controller's shell is absolutely identical to the original Sega controller and the cord looks and feels the same as well; with the only difference being that the Retro-Bit controller features a 10 foot long cord as opposed to the 6 foot cord on the Sega controller. Aside from the lack of a "TM" next to the Sega logo on the front and the addition of the Retro-Bit logo on the back, the text on the controller is just the same as the original and the only obvious difference is that the finish on the D-pad and A/B/C buttons on the Retro-Bit controller have a soft matte texture to them whereas the D-pad and A/B/C buttons on the original controller are slightly glossy. As long as we're on the subject of the D-pad and buttons, when pressed down the only difference I could feel between Retro-Bit's D-pad and buttons and the original were that the Retro-Bit ones required ever so slightly more pressure to activate; somewhere in the area of 3 to 5 grams of actuation force if I had to venture a guess. To give them a proper test with a fairly demanding game I popped Mortal Kombat II into my Genesis and first did a full play through of the tournament mode with my original Sega controller, then upon beating the tournament did a second play through with the Retro-Bit controller. After two play through's of MK II's tournament I'm pleased (and a little surprised, to be completely honest) to say that I could find no discernible difference in build quality or function between Retro-Bit's new Genesis controller and Sega's original from 1994. During the 45 minutes or so I spent playing through MK II's tournament mode with the Retro-Bit controller I never once experienced a false input and in practice the tiny bit of extra force required to move the D-Pad and buttons was negligible. My thumbs didn't feel any more tired after playing with Retro-Bit's controller than Sega's and none of my movements felt any slower or less precise. In order to get a better idea of why Retro-Bit's controller performed every bit as good as Sega's original, let's open them up and take a look inside. Peering inside, it quickly becomes apparent why Retro-Bit's new Genesis controller performs so well. It is in every respect, down to the millimeter, an exact copy of the original Sega design. They are so identical that I would be very surprised if they weren't using the same mold that the originals were made with. With the exception of the screws that secure the two shell halves together (which are slightly longer on the Sega controller) every part is 100% interchangeable between the two controllers. In fact, when I swapped the silicone button and D-pad contact pads from the Sega controller into the Retro-Bit one the actuation force required to press the D-Pad and buttons became exactly the same as the Sega controller had; which makes it pretty clear that the only reason the Retro-Bit controller's buttons and D-pad required a tiny bit more force to press is because it has brand new silicone pads in it and the Sega controller's silicone pads are about 25 years old at this point. The especially nice thing about Retro-Bit's controllers being internally identical to the original Sega ones is that if you do ever manage to wear out the silicone button contacts or any other part then they can be easily replaced with any of the numerous replacement parts on the market made for Sega's original controllers. With that future proofing in mind I give Retro-Bit's Sega Genesis 6 Button Arcade Pads my highest recommendation. Never in my life have I encountered a third party controller for any system that was such a perfect copy of the original first party controller as these, and at only $15 each and officially licensed by Sega there's absolutely no reason whatsoever that I can think of to go try and hunt down a used original Sega controller when Retro-Bit's new Genesis controllers are available. They are, for all practical purposes, the exact same controller. Whether your looking for some top quality wired controllers to pair with your new Analogue Mega Sg or just need a good controller or two for your trusty old Genesis, I don't think you'll find a better option than Retro-Bit's Sega Genesis controllers anywhere; past or present.
- 12 replies
-
- 9
-

-
- Retro-Bit
- Sega Genesis
- (and 2 more)
-
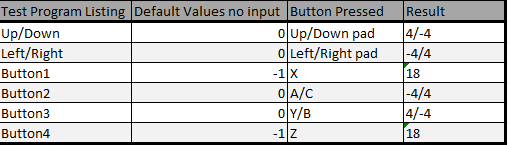
This is a 6 button 8 directional gamepad for the TI-99/4a natively. (No Adaptors needed) It's meant to be a D.I.Y. project. Total cost to me was Aprox. $19.00 US for 2 gamepads and 20 diodes. Controller Source - https://www.amazon.com/gp/product/B00EAM862S/ref=oh_aui_detailpage_o02_s00?ie=UTF8&psc=1 Diode source - https://www.amazon.com/gp/product/B005T6Q3RE/ref=oh_aui_detailpage_o01_s00?ie=UTF8&psc=1 I don't know who created the original schematic, I find it all over the web. But the original in the upper left of my picture below is of a 2 port atari adaptor for the TI-99/4a created by someone else. Same goes for the pin out diagram for the TI side including the 2 db9 pictures. Add to that other materials used (solder, wiring, glue) for pennies PLUS time and you have yourself 2 TI-99/4a Gamepads, one for each console. If I were asked to build one for someone, I'd ask for $20 $40 per joypad completely modded as shown. I had to up the price because it takes me a couple of hours to complete a mod on one Joypad including setup and breakdown times. I highly encourage you all to do this MOD yourself but if you really want me to do it for you, I have to ask for more money due to time. Looking at the attached picture will show you how I did this with the materials I had. I'll give some notes here: 1. Plan ahead with your own drawings that you understand. Your wire colors may differ depending on the controller you go with. Test them all and make your own chart for pin#, colour, board location.You'll want a controller that has all 9 wires to be certain. Sega Genesis controllers are like that as far as I know. 2. Test every wire and connection from the cable end to the connection ends as you go along. Check all solder points and pad connectivity as you go. One at a time. 3. It's easiest to do the Joy1 and Joy 2 connections first since they do not have diodes associated with them. 4. Be sure to isolate all traces. I used a dremel to obliterate the logic chip in to dust and cut all the lines. I isolated each solder point the gamepad already had and made sure joy1 and joy2 check lines were isolated from each other. review the photo and follow the traces. It should all make perfect sense. 5. I used Hot Glue to hold things in place and I applied it as I went along ensuring I isolated all possible shorts (using hot glue as an insulator). 6. I also drilled holes next to all the already connected wires on the board to allow me an easy path for my connections. You can see the unused holes in the picture for lines 1->7 and 6->5. 7. I was fortunate that the gamepad board had exposed round pads of bare solder. I suppose those were for Q/A testing. I drilled holes next to the ones I needed for new connections. I had to scratch the enamel off the common trace for J1 Signal sitting in the middle of the 4 directionals due to lack of circle solder pad. You can see the circle pads I soldered to, there are a few unused. Look at the ones near the middle buttons that went unused in the picture below.... 8. Be careful not to short any bare wires, be aware not to close holes that were there already (for encasement pins) and of course be aware of your drilled holes when applying hot glue if you choose to mimic my method. 9. I borrowed a program from another Topic thread to test. There was a typo in the original, find it and fix it. - Source = http://atariage.com/forums/topic/166557-proplay-new-4-button-gamepad-for-ti/?p=2058171 Already fixed and slightly customized code. Note: I think it's inefficient for game controller code but works for testing. My Test Results. 10. Use it as intended. - You can certainly use this gamepad as a single player Joy1 for any existing games you have. OR play two player games on one gamepad.(WHuh?Why? I know) However; the joy 2 buttons are just that, for Joy 2. So if you press them in conjunctions with Joy1 buttons in a game such as PARSEC (pressing up on both Joy1 and 2 at the same time) it will allegedly cause glitches or something undesirable (no damage just in game controller glitch). Don't blame the joypad. If you connect two TI joysticks and did the same thing, you'll probably get the same glitches. It doesn't make sense to use the controller in this way for existing games that aren't coded for this. 11. Further modifications were necessary. The bottom half of the controller housing has cylinders molded in to fit flush against the PCB. I needed to give 'em a little shave with the dremel to fit the wiring and hot glue. 12. Don't hold me responsible if you destroy the planet by attempting or using this modification. Or even if you break your console or something less destructive than destroying the entire planet. I knew the risks and now you do too, If you follow these instructions, any part of them, in real life you do so at your own peril. Just because it worked for me....doesn't mean it'll work for you in the sense that it could have been my fault. Last but not least. You will need games specifically coded to work with the full functionality of this controller. The game pad directionals and the X button are the Joystick 1 directionals and fire button. Y/B/A/C/Z buttons are for Joystick2 as follows in same order Up/Down/Left/Right/Fire. I attempted to make my connections standard. So anyone who wants to make their own 6 button gamepad for the TI to code for, please take in to account the button assignments. Together we can establish a new standard in TI gaming and ensure our programs work across the board with any controllers folks my make on their own utilizing this Topic Thread,. THE START BUTTON IS UNUSED AND DOES NOTHING. Of course, I rate this project as easy for an ametuer. But do ask and learn, I used a heat sink for every solder point to protect the diodes. I don't know it that's unnecessary, but I did it anyway. Thanks to everyone here for encouragement and help. Now it's time to start making games that can take advantage of this design and layout. Get creative. Street Fighter? Tanks game where you can move one way and rotate the turret another? Puzzle games where you have to control 2 characters to solve the puzzle ? (Castle of Dr. Creep anyone? - (C64 game) or The Goonies?) RPGs with spell, attack, defend, jump, dodge buttons? What would you like to play on your TI with a 6 button gamepad? Make it, Code it, Play it. Share it. Do it.


-
Hi All, A strange issue has developed with my Model 2 Sega Genesis. Under most circumstances, the Sega system seems to think that the "up" button on controller 1 is being perpetually pressed. However there is one very specific circumstance where it works correctly. It will work correctly if I have a 3 button controller in the first port and a 6 button controller in the second port. Only in this specific configuration will it work correctly, and these are genuine Sega controllers. If I swap the controllers or have only one controller connected or even no controller connected, perpetual "up." Any ideas? Is there any chance I am damaging anything continuing to play it since it does seem to work in that configuration? --DiscoDr.Bones
-
Hello! I am looking for a 6 Button controller for the Sega Genesis. I am looking for one with individual Turbo switches and a mode button. If Sega made one like this then that would be optimal but any brand will do if it's good. Also I would be interested in Sega Genesis games if anyone wants to sell a bunch for relatively cheap. That's it for the Genesis. If anyone has the Raiden game for the orginal PlayStation, I'd be interested. Also for the PlayStation, I'd be Market for a high capacity Memory Card, an original gray Dual Shock Controller and a couple of quality arcade sticks. I'm thinking of building a Raiden arcade machine that runs with a PS1.
-
 Sold Here are 3 tested and working wireless controllers for the Sega Genesis with 2 working receivers. As an additional bonus I am including 1 extra untested 6 button corded Genesis controller. 1 of the 3 wireless controllers has a small piece of plastic broke off it as shown in the 2nd picture, but it does work. The other 2 are undamaged. $50 for 2 controllers and a receiver is a good deal, so an extras make it a steal.


